macOS Animated Screensaver with C and OpenGL
2021/03/03
I've used frameworks and libraries powered by OpenGL, but wanted to see what it's like using only raw OpenGL API's in C. So I spent an afternoon making this little generative experiment and wrapped it to work as a macOS screensaver with Xcode. Perhaps not my finest generative work, but the process is interesting to share.
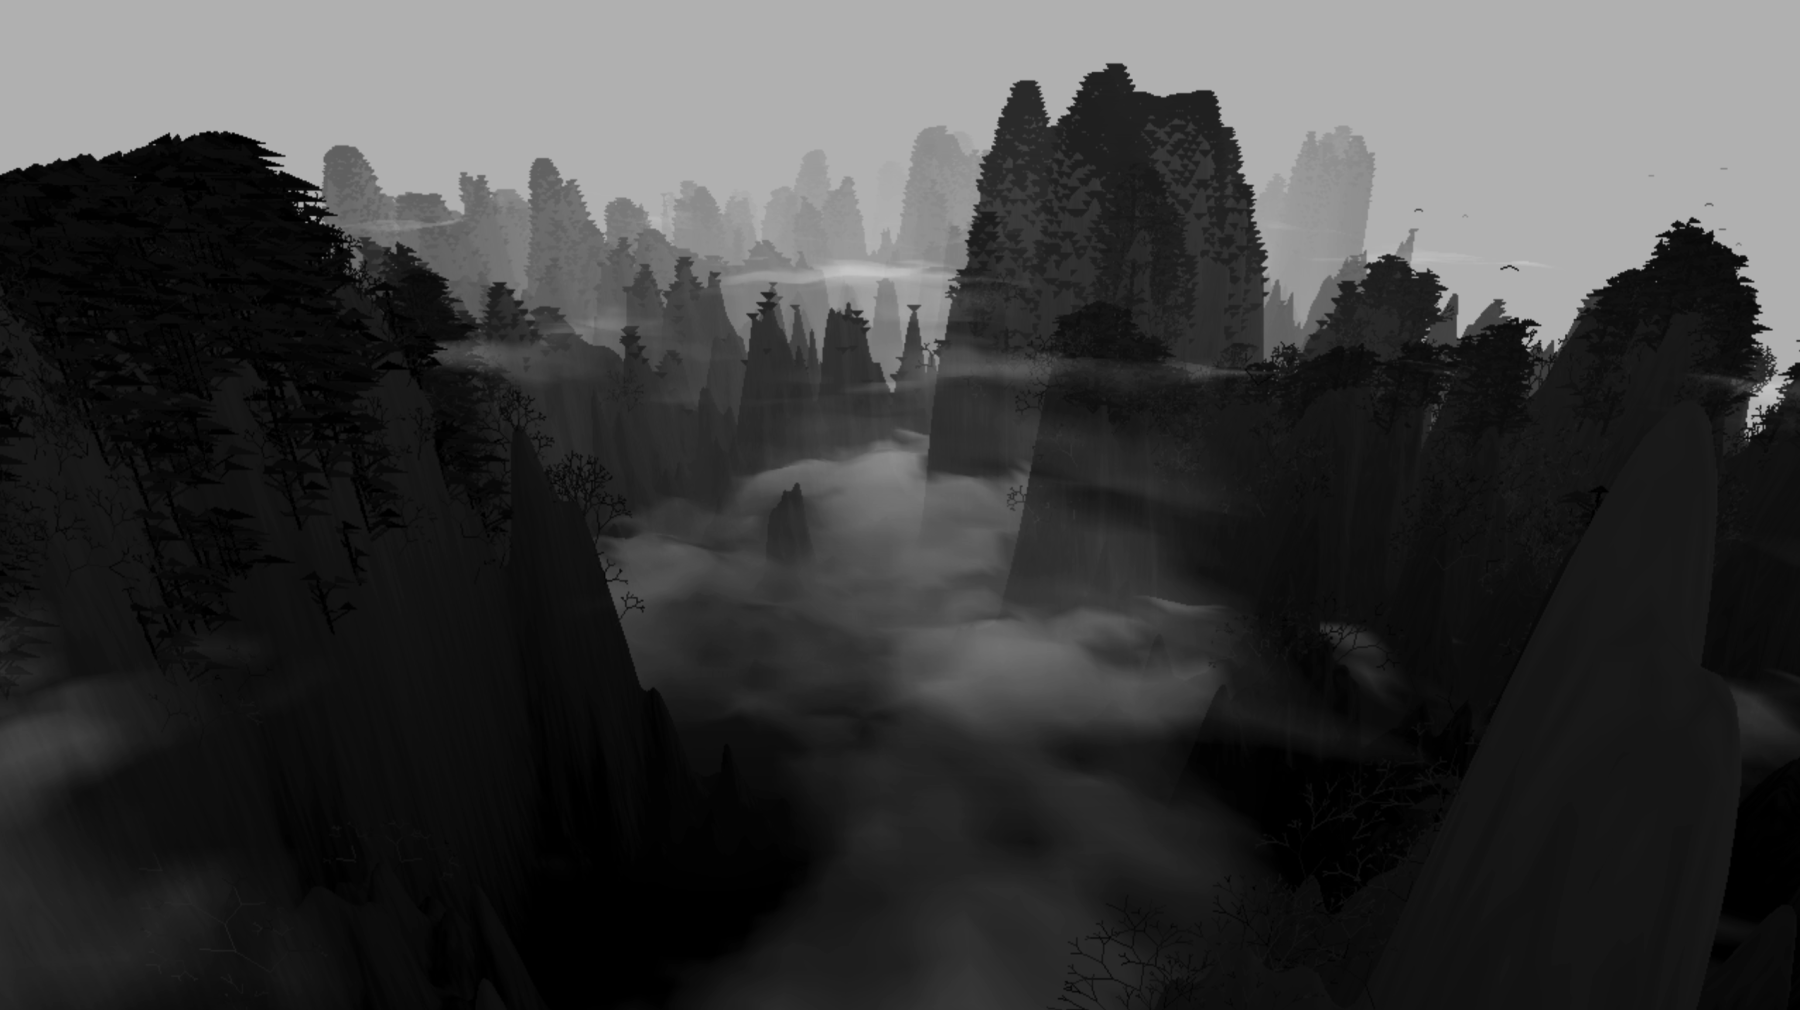
The generated scenery, shown in the above screenshot, is loosely inspired by the Yellow Mountains, in Anhui, China.
Check out the full source code (500 lines, single file) instead if you prefer reading C to reading English like me.
Setting up
First we start with a regular C program, i.e. a non-screensaver version, so that we do not need to re-install the screensaver every time we want to test the program.
If you're only interested in making a screensaver and not the OpenGL/procedural generation stuff, skip to Making a Screensaver section below, or just follow this guide on which my wrapper is based.
The code has no dependencies besides OpenGL and GLUT, so on most systems you can get started right away without needing to install anything.
After creating a C file, include the OpenGL headers:
#ifdef __APPLE__
#include <OpenGL/gl.h>
#include <GLUT/glut.h>
#else
#include <GL/gl.h>
#include <GL/glut.h>
#endif
To compile from the commandline (macOS), use:
gcc main.c -framework OpenGL -framework GLUT
For non-macOS systems, perhaps substitute the framework flags with -lgl and -lglut.
run with
./a.out
To compile in Xcode, go to File→New project→macOS→Commandline Tool.

Put the same header inclusion code in the main C file created by Xcode, then Go to “Build Phases” and “+” OpenGL and GLUT to “Link Binary With Libraries”:

Click “Play” to build and run.
Generating Terrain
To generate the terrain, I used Perlin noise. Because the mountains are not going to change shape over time (at least not for many years), we're storing the height map in memory during start up, like so:
int hmw = 1200;
int hmh = 1500;
float hmr = 0.32;
float* heightmap;

float sigmoid (float x, float k){
  return 1/(1+exp(-k*(x-0.5)));
}

void setup(){
  heightmap = (float*)malloc(sizeof(float)*hmw*hmh);

  for (int i = 0; i < hmh; i++){
    for (int j = 0; j < hmw; j++){
      float ns0 = noise((float)i*0.005,(float)j*0.005,0);
      float ns1 = noise((float)i*0.02,(float)j*0.02,1);
      float ns2 = noise((float)i*0.005,(float)j*0.005,2);

      float g0 = sigmoid(ns0*0.5 + ns1*0.5,20);

      float g = g0*g0*ns2;
      heightmap[i*hmw+j] = g*120;
    }
  }
}
You can see that I've called the noise() function three times, each with a different scaling, and added them up. This gives fine control over the general shape and the details of the generated mesh. You can try playing with them for different “flavours”.
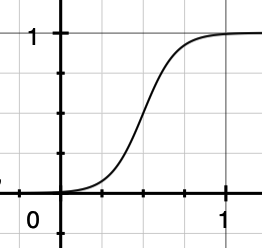
The sigmoid() function brings low values lower and high values higher, while steepening the middles, to simulate the distinct characteristics of the types mountains you can find in eastern China.
e.g. The graph of looks something like:
The noise() function, which I ported to C from the p5.js library, can be found in the full source code.
Displaying with OpenGL
After we've generated the terrain, we would like to use OpenGL to display it on the screen.
But first, we define some macros for linear algebra, since they're useful in computing the model transformation matrices and other maths we'll be using later:
#define V3_CROSS(a1,a2,a3,b1,b2,b3) {(a2)*(b3)-(a3)*(b2),(a3)*(b1)-(a1)*(b3),(a1)*(b2)-(a2)*(b1)}
#define V3_DOT(a1,a2,a3,b1,b2,b3)   ((a1)*(b1)+(a2)*(b2)+(a3)*(b3))
#define V3_MAG(a1,a2,a3) (sqrt((a1)*(a1)+(a2)*(a2)+(a3)*(a3)))

#define MAT_IDEN {1,0,0,0, 0,1,0,0, 0,0,1,0, 0,0,0,1}
#define MAT_ROTX(a) {1,0,0,0, 0,cos(a),sin(a),0, 0,-sin(a),cos(a),0, 0,0,0,1}
#define MAT_ROTY(a) {cos(a),0,-sin(a),0, 0,1,0,0, sin(a),0,cos(a),0, 0,0,0,1}
#define MAT_ROTZ(a) {cos(a),sin(a),0,0,-sin(a),cos(a),0,0, 0,0,1,0, 0,0,0,1}
#define MAT_TRSL(x,y,z) {1,0,0,0, 0,1,0,0, 0,0,1,0, x,y,z,1}
#define MAT_SCAL(x,y,z) {x,0,0,0, 0,y,0,0, 0,0,z,0, 0,0,0,1}
#define MAT_MULT(A,B) {(A)[0]*(B)[0]+(A)[1]*(B)[4]+(A)[2]*(B)[8]+(A)[3]*(B)[12],(A)[0]*(B)[1]+(A)[1]*(B)[5]+(A)[2]*(B)[9]+(A)[3]*(B)[13],(A)[0]*(B)[2]+(A)[1]*(B)[6]+(A)[2]*(B)[10]+(A)[3]*(B)[14],(A)[0]*(B)[3]+(A)[1]*(B)[7]+(A)[2]*(B)[11]+(A)[3]*(B)[15],(A)[4]*(B)[0]+(A)[5]*(B)[4]+(A)[6]*(B)[8]+(A)[7]*(B)[12],(A)[4]*(B)[1]+(A)[5]*(B)[5]+(A)[6]*(B)[9]+(A)[7]*(B)[13],(A)[4]*(B)[2]+(A)[5]*(B)[6]+(A)[6]*(B)[10]+(A)[7]*(B)[14],(A)[4]*(B)[3]+(A)[5]*(B)[7]+(A)[6]*(B)[11]+(A)[7]*(B)[15],(A)[8]*(B)[0]+(A)[9]*(B)[4]+(A)[10]*(B)[8]+(A)[11]*(B)[12],(A)[8]*(B)[1]+(A)[9]*(B)[5]+(A)[10]*(B)[9]+(A)[11]*(B)[13],(A)[8]*(B)[2]+(A)[9]*(B)[6]+(A)[10]*(B)[10]+(A)[11]*(B)[14],(A)[8]*(B)[3]+(A)[9]*(B)[7]+(A)[10]*(B)[11]+(A)[11]*(B)[15],(A)[12]*(B)[0]+(A)[13]*(B)[4]+(A)[14]*(B)[8]+(A)[15]*(B)[12],(A)[12]*(B)[1]+(A)[13]*(B)[5]+(A)[14]*(B)[9]+(A)[15]*(B)[13],(A)[12]*(B)[2]+(A)[13]*(B)[6]+(A)[14]*(B)[10]+(A)[15]*(B)[14],(A)[12]*(B)[3]+(A)[13]*(B)[7]+(A)[14]*(B)[11]+(A)[15]*(B)[15]}
(I find myself copy-pasting these macros to all my graphics-related projects.)
If any of the formulae look unfamiliar, check out cross product, dot product, matrix multiplication, transformation matrices and rotation matrices on wikipedia.
Now we define a draw() function, where we ask OpenGL to render the terrain:
void draw(){
  srand(0);

  //select clearing (background) color
  glClearColor(0.65, 0.65, 0.65, 0.0);

  //initialize viewing values
  glMatrixMode(GL_PROJECTION);
  glLoadIdentity();
  gluPerspective(60, (float)W/(float)H, 1, 512);

  float mat0[] = MAT_ROTX(0.4);
  float mat1[] = MAT_TRSL(-sin(frameCount*0.01)*10,-80,-5);
  float mat[] = MAT_MULT(mat1,mat0);
  glMatrixMode(GL_MODELVIEW);
  glLoadMatrixf(mat);

  glBegin( GL_QUADS );
  for (int i = 0; i < hmh-1; i++){
    for (int j = 0; j < hmw-1; j++){
      glVertex3f( (-hmw/2+j)*hmr,   heightmap[i*hmw+j],-(i  )*hmr);
      glVertex3f( (-hmw/2+j+1)*hmr, heightmap[i*hmw+j+1],-(i  )*hmr);
      glVertex3f( (-hmw/2+j+1)*hmr, heightmap[(i+1)*hmw+j+1],-(i+1)*hmr);
      glVertex3f( (-hmw/2+j)*hmr,   heightmap[(i+1)*hmw+j],-(i+1)*hmr);
    }
  }
  glEnd();
}
In the code above, we first tell OpenGL to clear the screen, then we compute an optimal viewing angle using transformation matrices, tell OpenGL to load the matrix, and finally draw the terrain as a bunch of quads. Notice how we iterate over each point in our heightmap, and specify the vertices of the quad (ABCD) like so:
 j,i   j+1,i
 A-----B
 |     |
 |     |
 D-----C j+1,i+1
j,i+1
Also notice the “panning” animation to the camera created with MAT_TRSL as a function of frameCount which we'll define in the next snippet, along with W and H, the dimensions of the display window.
The last step before we start seeing stuff on the screen, is to put in the OpenGL boilerplate to drive our setup() and draw() functions.
int initialWindowReshape = 3;
int W = 1280;
int H = 720;
int frameCount = 0;
void display(void){
  if (initialWindowReshape>0){
    glutReshapeWindow(W+initialWindowReshape-1,H);
    initialWindowReshape--;
  }
  draw();
  glFlush();
  frameCount ++;
}
void animationFrame(){
  glutPostRedisplay();
  glutTimerFunc( 10, animationFrame, 1);
}
void onreshape(){
  if (initialWindowReshape<=0){
    W = glutGet(GLUT_WINDOW_WIDTH);
    H = glutGet(GLUT_WINDOW_HEIGHT);
    printf("%d %d\n",W,H);
  }
}
int main(int argc, char** argv) {
  //Initialise GLUT with command-line parameters.
  glutInit(&argc, argv);
  //Set Display Mode
  glutInitDisplayMode(GLUT_SINGLE | GLUT_RGB | GLUT_DEPTH);
  //Set the window size
  glutInitWindowSize(W,H);
  //Set the window position
  glutInitWindowPosition(0,0);
  //Create the window
  glutCreateWindow(" ");
  setup();
  //Call "display" function
  glutDisplayFunc(display);
  glutReshapeFunc(onreshape);
  glutTimerFunc( 10, animationFrame, 1);
  //Enter the GLUT event loop
  glutMainLoop();
  return 0;
}
Notice the initialWindowReshape variable. If you're not on a macOS system, you probably wouldn't need it. It is there to cope with the macOS+OpenGL bug in which you will be looking at a blank window when you initially fire up the app, until you move/resize the window a bit, for the graphics content to actually show up. This code does the resizing programmatically to save the user of the annoyance.
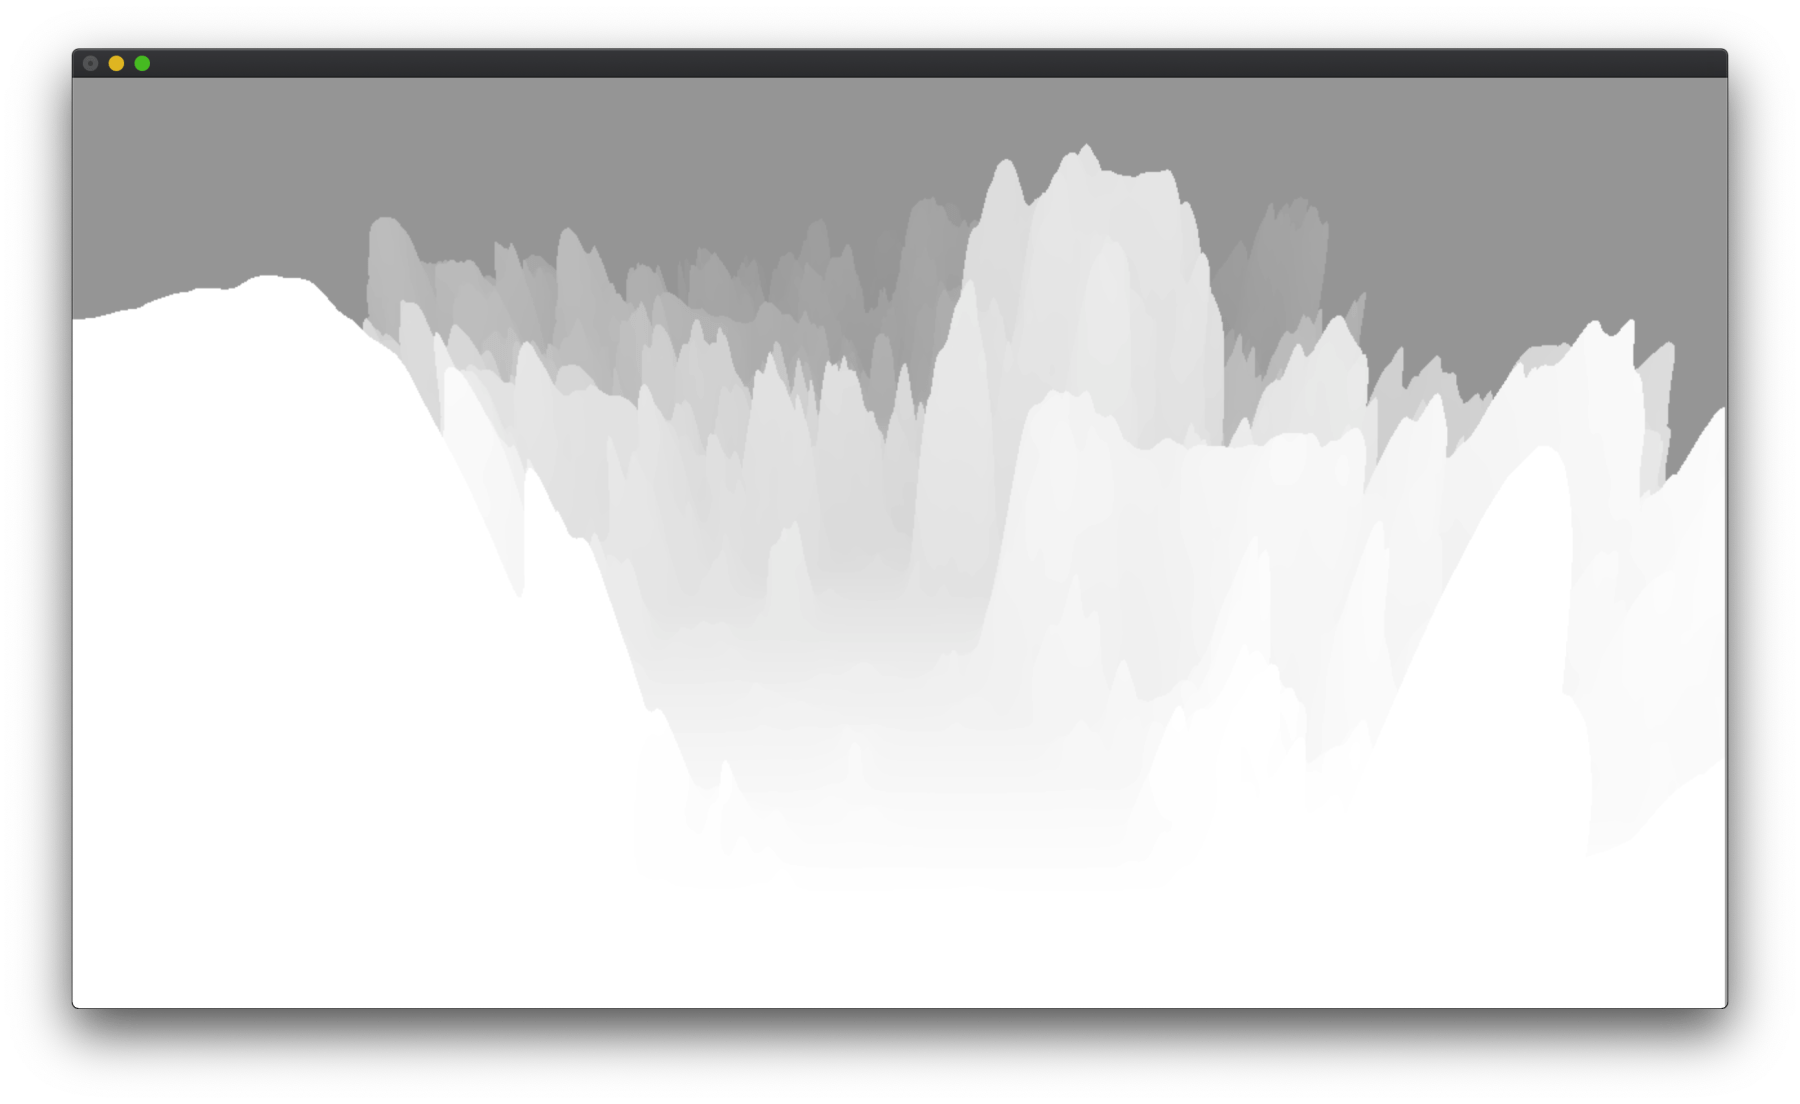
If all went well, you'll be seeing something like this:

Since we haven't slapped any shader or vertex colors on the mesh, everything is colored white and we get a boring binary image with no illusion of 3D.
So let's add some “fog” to get some depth illusions, inserting these lines right after gluPerspective in draw():
glEnable( GL_BLEND );
glBlendFunc(GL_SRC_ALPHA, GL_ONE_MINUS_SRC_ALPHA);

glEnable(GL_DEPTH_TEST);
glDepthMask(GL_TRUE);
glDepthFunc(GL_LESS);
glClear(GL_COLOR_BUFFER_BIT | GL_DEPTH_BUFFER_BIT);

glEnable (GL_FOG);
glFogi(GL_FOG_MODE, GL_LINEAR);
GLfloat fogColor[4] = {0.65, 0.65, 0.65,1.0f};
glFogfv(GL_FOG_COLOR, fogColor);
glHint(GL_FOG_HINT, GL_DONT_CARE);
glFogf(GL_FOG_DENSITY, 1.0f);
glFogf(GL_FOG_START,100);
glFogf(GL_FOG_END,400);
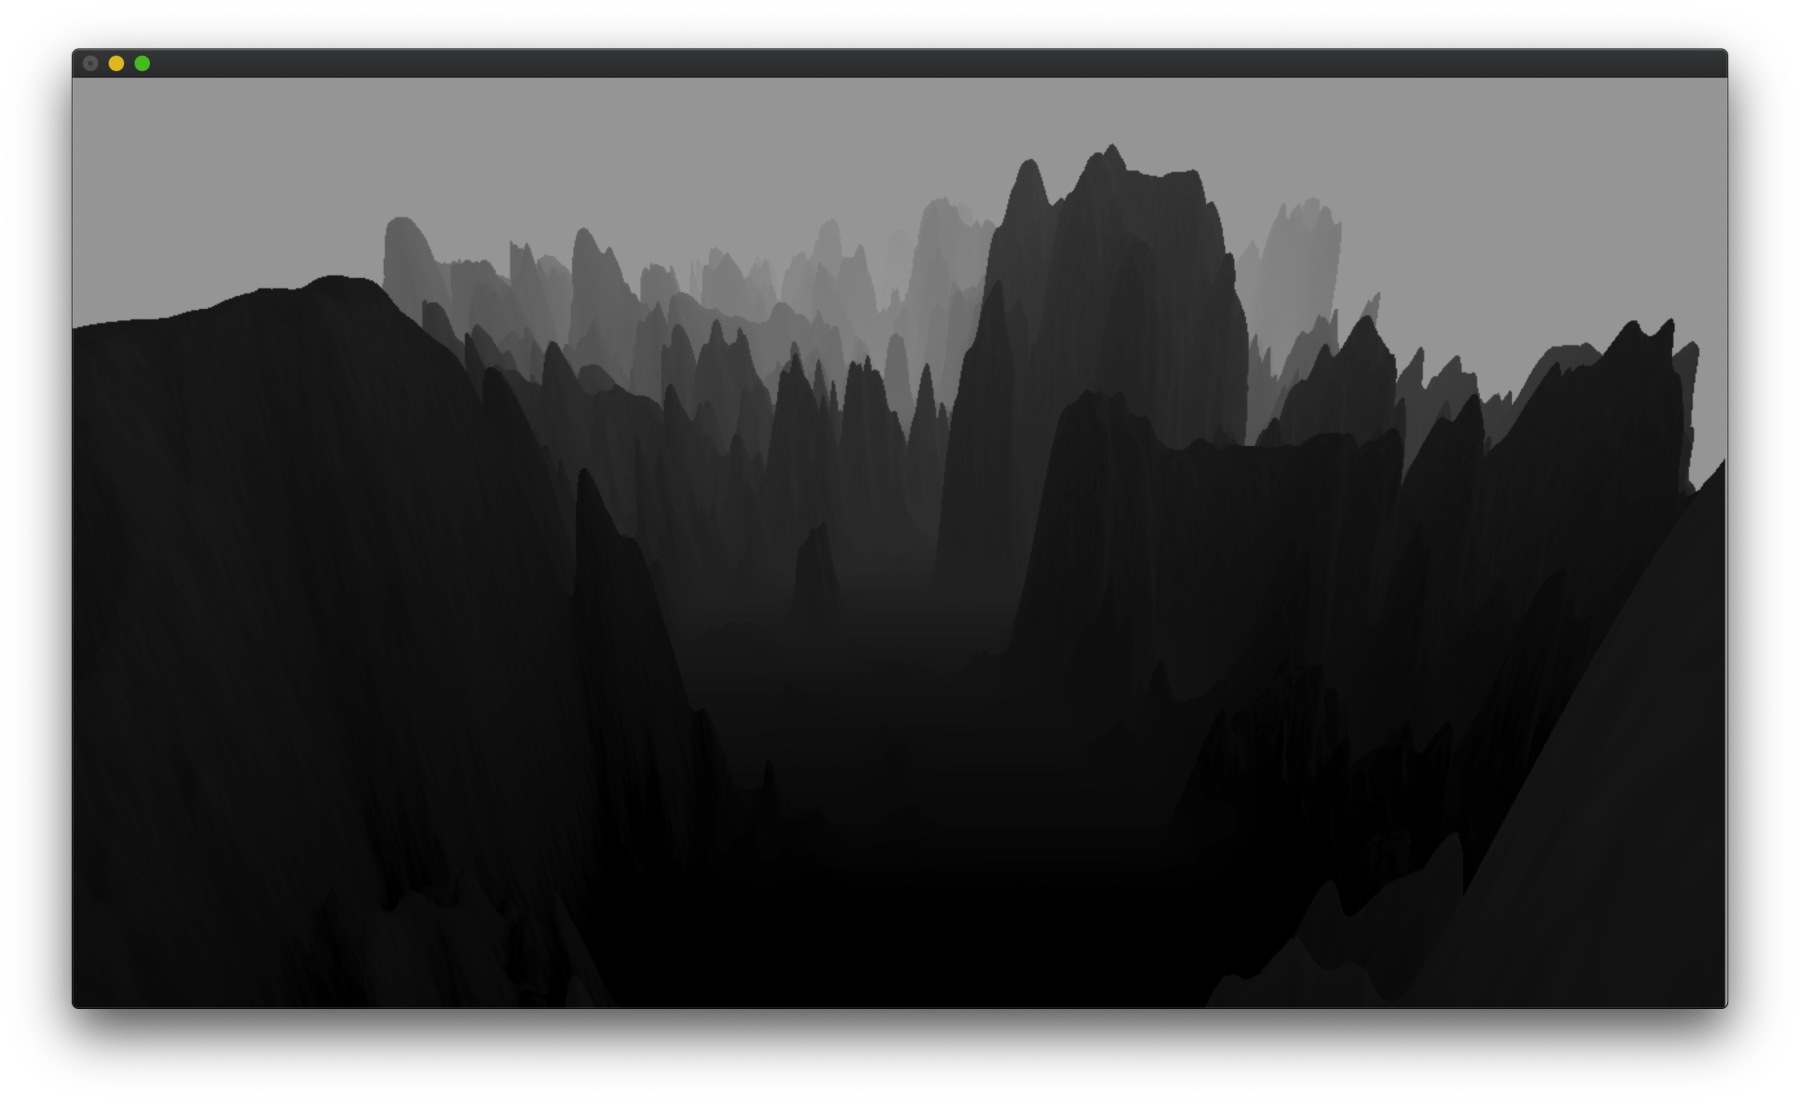
Finally, we get to admire the Perlin noise:
Shading the Terrain
At one point I wrote GLSL shader to paint the terrain, but it turns out vertex colors was quite sufficient and I went with those instead.
The technique used here is baking the Lambertian lighting (“n dot l”) and adding a bit of randomness into the vertex colors.
In setup(), I created another array to hold the colors. It's inaccurately named heightmapnorm due to historical reasons:
float* heightmapnorm;
float light[3] = {0.6,0.0,0.0};

// void setup(){...

heightmapnorm = (float*)malloc(sizeof(float)*hmw*hmh);
for (int i = 1; i < hmh-1; i++){
  for (int j = 1; j < hmw-1; j++){
    float o = heightmap[i*hmw+j];
    float a[] = {-hmr,(-o+heightmap[i*hmw+j-1]  ),   0};
    float b[] = { hmr,(-o+heightmap[i*hmw+j+1]  ),   0};
    float c[] = { 0,  (-o+heightmap[(i-1)*hmw+j]),-hmr};
    float d[] = { 0,  (-o+heightmap[(i+1)*hmw+j]), hmr};
    float bc[] = V3_CROSS(b[0],b[1],b[2], c[0],c[1],c[2]);
    float ca[] = V3_CROSS(c[0],c[1],c[2], a[0],a[1],a[2]);
    float ad[] = V3_CROSS(a[0],a[1],a[2], d[0],d[1],d[2]);
    float db[] = V3_CROSS(d[0],d[1],d[2], b[0],b[1],b[2]);
    float lbc = V3_MAG(bc[0],bc[1],bc[2]);
    float lca = V3_MAG(ca[0],ca[1],ca[2]);
    float lad = V3_MAG(ad[0],ad[1],ad[2]);
    float ldb = V3_MAG(db[0],db[1],db[2]);

    float nml[] = {(bc[0]/lbc+ca[0]/lca+ad[0]/lad+db[0]/ldb)*0.25,(bc[1]/lbc+ca[1]/lca+ad[1]/lad+db[1]/ldb)*0.25,(bc[2]/lbc+ca[2]/lca+ad[2]/lad+db[2]/ldb)*0.25};

    heightmapnorm[i*hmw+j] = o*0.002-0.02+0.05*fmax(0,fmin(1,V3_DOT(nml[0],nml[1],nml[2],light[0],light[1],light[2])))-0.02*(float)rand()/(float)RAND_MAX;
  }
}
In the code above, for each vertex, I first computed the normal of the 4 faces that shares the vertex. Then, the normal of the vertex is calculated as the average between the 4 normals of the faces.
The formula for the normal of a face is the cross product between two vectors that lies on the face, here we conveniently use the two edges incident on the vertex of interest as these vectors.
Once we've obtained the normal of the vertex, we compute the shaded color using the dot product of direction of light and the normal.
Finally, we add some randomness and some factor from the height to obtain the desired vertex color.
To inform OpenGL of our color choices, we modify the GL_QUAD loop we had earlier, using glColor3f() to specify color for each vertex, like so:
glBegin( GL_QUADS );
for (int i = 0; i < hmh-1; i++){
  for (int j = 0; j < hmw-1; j++){
    glColor3f(heightmapnorm[(i*hmw+j)],heightmapnorm[(i*hmw+j)],heightmapnorm[(i*hmw+j)]);
    glVertex3f( (-hmw/2+j)*hmr,   heightmap[i*hmw+j],-(i  )*hmr);
    glColor3f(heightmapnorm[(i*hmw+j+1)],heightmapnorm[(i*hmw+j+1)],heightmapnorm[(i*hmw+j+1)]);
    glVertex3f( (-hmw/2+j+1)*hmr, heightmap[i*hmw+j+1],-(i  )*hmr);
    glColor3f(heightmapnorm[((i+1)*hmw+j+1)],heightmapnorm[((i+1)*hmw+j+1)],heightmapnorm[((i+1)*hmw+j+1)]);
    glVertex3f( (-hmw/2+j+1)*hmr, heightmap[(i+1)*hmw+j+1],-(i+1)*hmr);
    glColor3f(heightmapnorm[((i+1)*hmw+j)],heightmapnorm[((i+1)*hmw+j)],heightmapnorm[((i+1)*hmw+j)]);
    glVertex3f( (-hmw/2+j)*hmr,   heightmap[(i+1)*hmw+j],-(i+1)*hmr);
  }
}
glEnd();
And we'll be seeing something like this:
The values I've been using are quite subtle, so it might look just like a mush of darkness to some eyes, but you can boost up the Lambertian factor in the code above, to check if you've got the formula right:

But as you can see once I do that it starts to look “cheap”, because we don't have much interesting texture or details to show and the diffuse lighting being most boring. So I'm tuning down the contrast to cover up the primitive nature of our program.
Growing Trees
Now it's time to add some life to the landscape by growing trees.
There're many randomizable parameters involved for a tree: positioning, poses for its branches, etc. In this program I'm only precomputing the positioning, which uses the relatively expensive noise() function, leaving other parameters to be determined when they're needed for drawing, relying on the resetting of random seed at the beginning of each frame (lazy me).
In setup(), I create an array the same size as the height map, to label what type of tree should be grown at each vertex of the terrain, if any.
char*  heightmaptree;
// void setup(){...
heightmaptree = (char* )malloc(sizeof(char )*hmw*hmh);
Despite the name, the array doesn't really hold any heightmaps, I just called it so because it's the same size as the other two arrays with heightmap in their names, so that I know they correspond.
We re-use the loop in which we computed the normal of each vertex, so that we don't grow any tree on the back-side of the mountains where the viewer cannot see (and save precious time):
for (int i = 1; i < hmh-1; i++){
  for (int j = 1; j < hmw-1; j++){
    // ... see earlier snippet where we computed the vertex normals

    if (nml[2] < 0.4 && (i % 2 == 0 && j % 2 == 0) && heightmap[i*hmw+j] > rand()%30 + noise((float)i*0.1,(float)j*0.1,13)*80 && rand()%100 > 10 && i > 50){
      if (noise((float)i*0.1,(float)j*0.1,42) > 0.5 || i < 100 || heightmap[i*hmw+j]<40){
        heightmaptree[i*hmw+j]=1;
      }else{
        heightmaptree[i*hmw+j]=2;
      }
    }else{
      heightmaptree[i*hmw+j]=0;
    }

    // ...
  }
}
As you can see above, by using some contrived logic we determined if at each spot there should be tree of type “1”, or tree of type “2”, or “0” for no tree.
The first type of tree I introduced was the binary fractal tree: pretty much a no-brainer addition that looks alright in almost all generative landscapes.
void drawTree(float x, float y, float z, float a, float aa, float d, int n){
  if (d < 0.2 || n <= 0) {
    return;
  }
  float x0=x+cos( a-aa)*d;
  float y0=y+sin( a-aa)*d;
  float x1=x+cos( a+aa)*d;
  float y1=y+sin( a+aa)*d;

  float col =0.1*(float)rand()/(float)RAND_MAX;
  glColor3f(col,col,col);

  glVertex3f(x,y,z);
  glVertex3f(x0,y0,z);
  glVertex3f(x,y,z);
  glVertex3f(x1,y1,z);

  drawTree(x0,y0,z,a-aa,aa,d*(0.3+0.7*(float)rand()/(float)RAND_MAX),n-1);
  drawTree(x1,y1,z,a+aa,aa,d*(0.3+0.7*(float)rand()/(float)RAND_MAX),n-1);
}
Check out this page if unfamiliar with fractal trees.
In draw() we add the following lines to use GL_LINES to call the tree-drawing function:
glLineWidth(1);
glBegin(GL_LINES);
for (int i = 0; i < hmh-1; i++){
  for (int j = 0; j < hmw-1; j++){
    if (heightmaptree[i*hmw+j]==1 && i < 500){
      drawTree((-hmw/2+j)*hmr, heightmap[i*hmw+j], -(i  )*hmr,M_PI/2,0.28+0.5*(float)rand()/(float)RAND_MAX,fmax(1,4-heightmap[i*hmw+j]*0.05),6);
    }
  }
}
glEnd();
Now we have something like this:
The second type of tree I added is some sort of simple pine tree: first we have a big stick (the trunk), then we draw a couple of triangles (the bulks of leaves), connected to the trunk with smaller sticks (the branches).
void drawTree2(float x, float y, float z){
  glLineWidth(3);
  glBegin(GL_LINES);
  glColor3f(0,0,0);
  glVertex3f(x,y,z);
  glVertex3f(x,y+5,z);
  glEnd();

  glLineWidth(2);
  for (int i = 0; i < 12; i++){
    float h = 6;
    float dx = 0;
    if (i != 0){
      h = ((float)rand()/(float)RAND_MAX)*5+1;
      dx = ((float)rand()/(float)RAND_MAX)*5-2.5;
    }
    float w0 = ((float)rand()/(float)RAND_MAX)*2.5;
    float w1 = ((float)rand()/(float)RAND_MAX)*2.5;

    glBegin(GL_LINES);
    glVertex3f(x,y+h-2,z);
    glVertex3f(x+dx,y+h-0.8,z);
    glEnd();

    float g = ((float)rand()/(float)RAND_MAX)*0.05;
    glColor3f(g,g,g);
    glBegin(GL_TRIANGLES);
    glVertex3f(x+dx,y+h,z);
    glVertex3f(x+dx+w0,y+h-0.8,z);
    glVertex3f(x+dx-w1,y+h-0.8,z);
    glEnd();
  }
}
Calling the function in draw():
for (int i = 0; i < hmh-1; i++){
  for (int j = 0; j < hmw-1; j++){
    if (heightmaptree[i*hmw+j]==2 && i < 500){
      drawTree2((-hmw/2+j)*hmr, heightmap[i*hmw+j], -(i  )*hmr);
    }
  }
}
Notice that so far for both types of trees, we used i < 500 in the if statement to ensure only trees closer than that distance is drawn. This is because we want to draw distant trees with an even simpler method, since they're so small we don't want to waste precious time on them. Instead we draw a single up-side-down triangle for each:
glBegin(GL_TRIANGLES);
for (int i = 0; i < hmh-1; i++){
  for (int j = 0; j < hmw-1; j++){
    if (heightmaptree[i*hmw+j]){
      glColor3f(0,0,0);
      if (i >= 500){
        glVertex3f((-hmw/2+j)*hmr,   heightmap[i*hmw+j], -(i  )*hmr);
        glVertex3f((-hmw/2+j)*hmr-1.5, heightmap[i*hmw+j]+1.5, -(i  )*hmr);
        glVertex3f((-hmw/2+j)*hmr+1.5, heightmap[i*hmw+j]+1.5, -(i  )*hmr);

      }
    }
  }
}
glEnd();
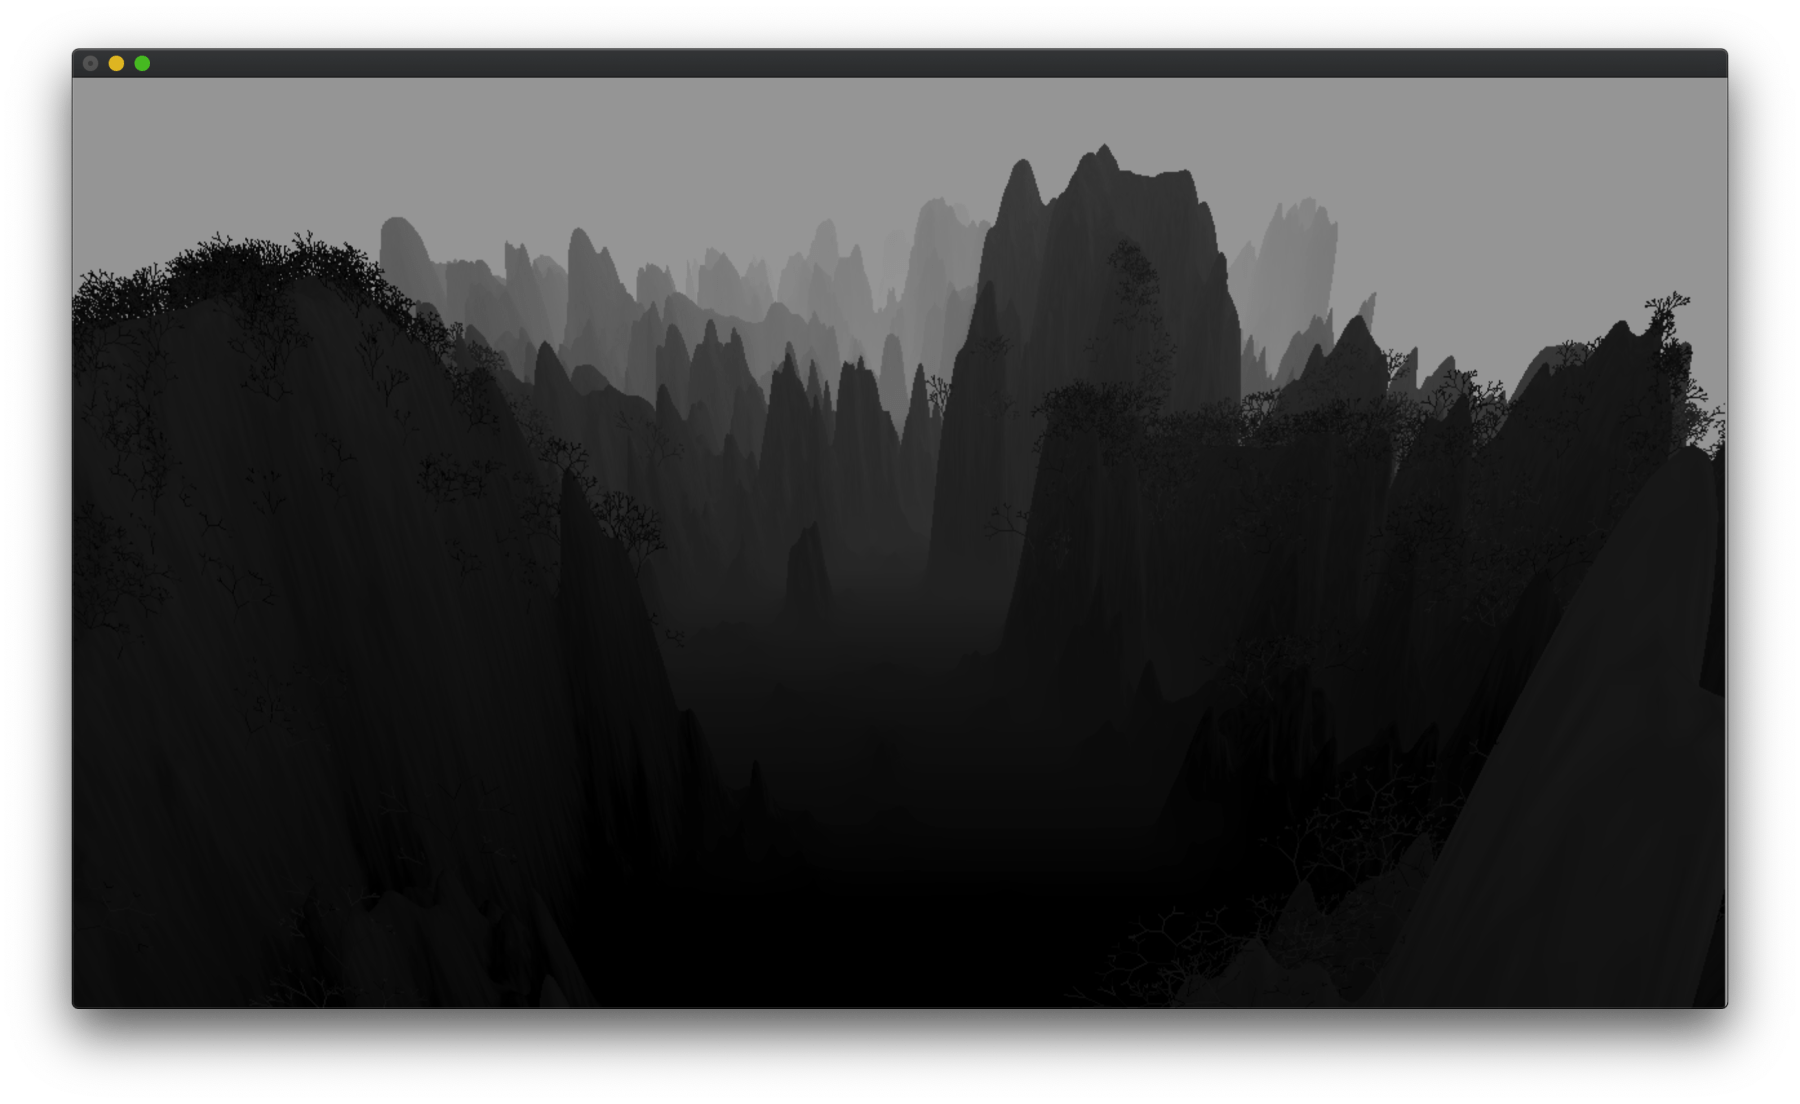
With all trees in place the landscape now looks more organic:
Making Clouds
It took me a while to figure out how best to simulate the clouds. The first thing I tried was semi-translucent quad strips facing the camera, spaced out at multiple depths. For each frame the vertices on the quad strips move slowly to simulate the flowing around of the clouds. It turned out to look goofy.
I ended up using a height-map-based method again. The clouds are like short semi-translucent white mountains, only that the sampling of the noise function shifts over time, to produce the illusion of the clouds flowing.
I made two of these meshes for the clouds: One is low and dense, to cover up the fact that we have nothing to show on the ground at the foot of the mountains, while the other is high and wispy, to whirl around the high peaks and add some “sublimity”.
In setup():
float* cloud;
// void setup(){...
cloud = (float*)malloc(sizeof(float)*hmw*hmh);

for (int i = 0; i < hmh; i++){
  for (int j = 0; j < hmw; j++){
    cloud[i*hmw+j] = noise((float)i*0.01,(float)j*0.01,99)*fmin(1,sin((float)j/(float)hmw*M_PI)*3);
  }
}
Notice how we used the function for [0,1] to shape the Perlin noise, fading out the either sides. This is to hide the discrepancy at the “edges” while sampling during the animation. Alternatively, we can use a noise function that loops.
And now the sampling code in draw(), first for the lower clouds:
glBegin( GL_QUADS );
int dx = 8;
for (int i = 0; i < 800; i+=dx){
  for (int j = 0; j < hmw-1; j+=dx){
    int jj = (j + frameCount)%(hmw-dx);

    float col0 = 0.8*(-0.3+((-heightmap[i*hmw+j])      )*0.05+cloud[i*hmw+jj]);
    float col1 = 0.8*(-0.3+((-heightmap[i*hmw+j+dx])    )*0.05+cloud[i*hmw+jj+dx]);
    float col2 = 0.8*(-0.3+((-heightmap[(i+dx)*hmw+j+dx]))*0.05+cloud[(i+dx)*hmw+jj+dx]);
    float col3 = 0.8*(-0.3+((-heightmap[(i+dx)*hmw+j])  )*0.05+cloud[(i+dx)*hmw+jj]);

    int ii = (i + 4 )%(hmh-dx);

    float h0 = 5+cloud[ii*hmw+jj]*20;
    float h1 = 5+cloud[ii*hmw+jj+dx]*20;
    float h2 = 5+cloud[(ii+dx)*hmw+jj+dx]*20;
    float h3 = 5+cloud[(ii+dx)*hmw+jj]*20;

    glColor4f(1.0,1.0,1.0,col0);
    glVertex3f( (-hmw/2+j)*hmr,   h0,-(i  )*hmr);

    glColor4f(1.0,1.0,1.0,col1);
    glVertex3f( (-hmw/2+j+dx)*hmr, h1,-(i  )*hmr);

    glColor4f(1.0,1.0,1.0,col2);
    glVertex3f( (-hmw/2+j+dx)*hmr, h2,-(i+dx)*hmr);

    glColor4f(1.0,1.0,1.0,col3);
    glVertex3f( (-hmw/2+j)*hmr,   h3,-(i+dx)*hmr);

  }
}
Then for the higher clouds:
for (int i = 0; i < hmh-1; i+=dx){
  for (int j = 0; j < hmw-1; j+=dx){
    int jj = (j + frameCount + 19)%(hmw-dx);

    float col0 = -0.4+((-heightmap[i*hmw+j])      )*0.05+cloud[i*hmw+jj];
    float col1 = -0.4+((-heightmap[i*hmw+j+dx])    )*0.05+cloud[i*hmw+jj+dx];
    float col2 = -0.4+((-heightmap[(i+dx)*hmw+j+dx]))*0.05+cloud[(i+dx)*hmw+jj+dx];
    float col3 = -0.4+((-heightmap[(i+dx)*hmw+j])  )*0.05+cloud[(i+dx)*hmw+jj];

    int ii = (i + 49 )%(hmh-dx);

    float h0 = 50+cloud[ii*hmw+jj]*10;
    float h1 = 50+cloud[ii*hmw+jj+dx]*10;
    float h2 = 50+cloud[(ii+dx)*hmw+jj+dx]*10;
    float h3 = 50+cloud[(ii+dx)*hmw+jj]*10;

    glColor4f(1.0,1.0,1.0,col0);
    glVertex3f( (-hmw/2+j)*hmr,   h0,-(i  )*hmr);

    glColor4f(1.0,1.0,1.0,col1);
    glVertex3f( (-hmw/2+j+dx)*hmr, h1,-(i  )*hmr);

    glColor4f(1.0,1.0,1.0,col2);
    glVertex3f( (-hmw/2+j+dx)*hmr, h2,-(i+dx)*hmr);

    glColor4f(1.0,1.0,1.0,col3);
    glVertex3f( (-hmw/2+j)*hmr,   h3,-(i+dx)*hmr);

  }
}
glEnd();
Pretty similar to the code with which we draw the terrain, but notice how we used glColor4f for semi-translucent colors.
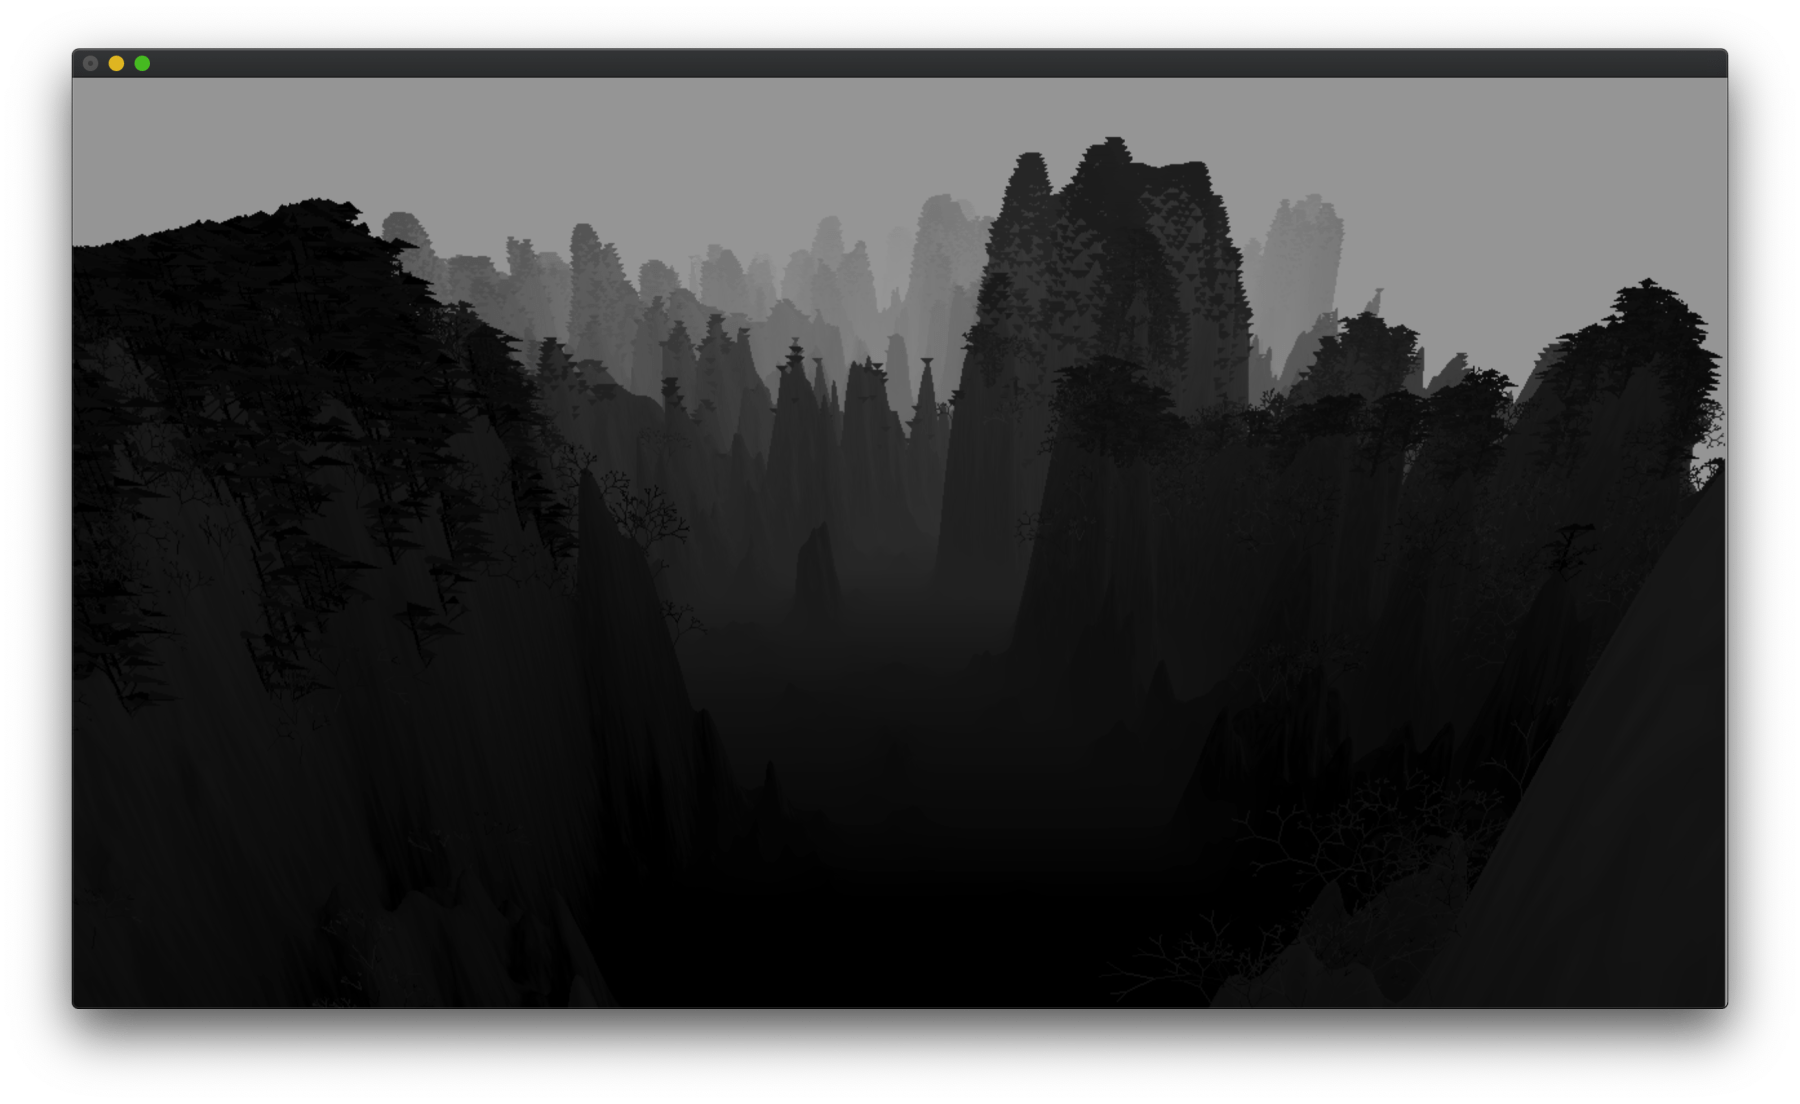
You'll now be able to see the “magnificent” rolling clouds:
Releasing the Birds
No clichéd Chinese landscape is complete without some birds.
Consistent with my lazy treatment of the other elements, I used two flapping lines to draw each bird.
First I initialize a storage, keeping track of the position (x,y,z) and phase (for flapping loop), totalling 4 floats, for each bird, like so:
float* birds;
int nbirds = 50;

// void setup(){...

birds = (float*)malloc(sizeof(float)*nbirds*4);
for (int i = 0; i < nbirds; i++){
  birds[i*4]   = rand()%100-50;
  birds[i*4+1] = rand()%60+40;
  birds[i*4+2] =-(rand()%500);
  birds[i+4+3] = ((float)rand()/(float)RAND_MAX);
}
Then in draw() we first compute a new transformation matrix just for the birds, angling their flight from distant right to near left. This way we offload the more difficult part of the math to OpenGL:
float mat10[] = MAT_ROTY(-0.8);
float mat11[] = MAT_TRSL(-60,-30,-60);
float matb[] = MAT_MULT(mat11,mat10);

glMatrixMode(GL_MODELVIEW);
glMultMatrixf(matb);
And then we draw the birds with GL_LINES :
glLineWidth(1);
glBegin(GL_LINES);
glColor3f(0,0,0);
for (int i = 0; i < nbirds; i++){
  float rx =birds[i*4];
  float ry= birds[i*4+1];
  float rz= birds[i*4+2];
  float l = sin((float)(frameCount)*0.5+birds[i*4+3]*M_PI*2);
  glVertex3f(rx,ry-l,rz);
  glVertex3f(rx-1,ry,rz);
  glVertex3f(rx,ry-l,rz);
  glVertex3f(rx+1,ry,rz);

  glVertex3f(rx,ry-l,rz-0.3);
  glVertex3f(rx,ry-l,rz+0.3);
  birds[i*4+2]+=2;
  if (birds[i*4+2]>hmh*hmr/2){
    birds[i*4+2]=-hmh*hmr/2;
  }
}
glEnd();
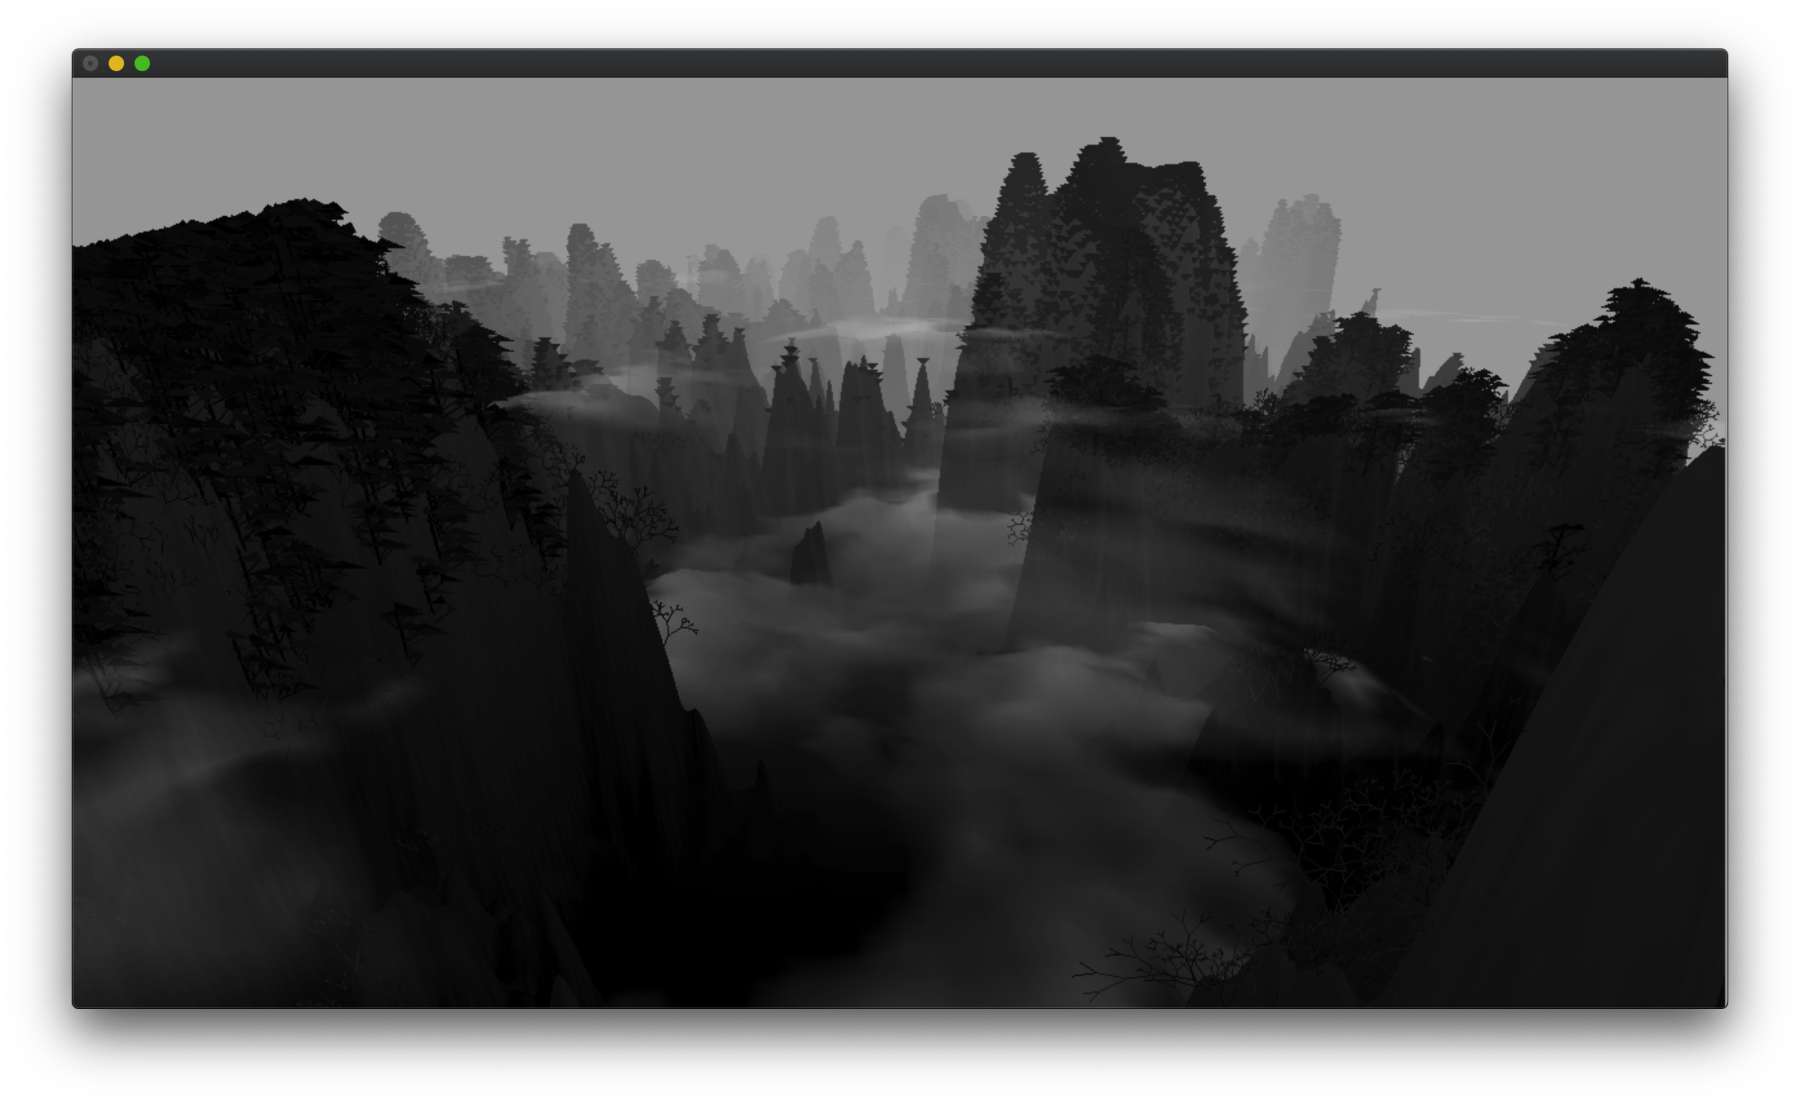
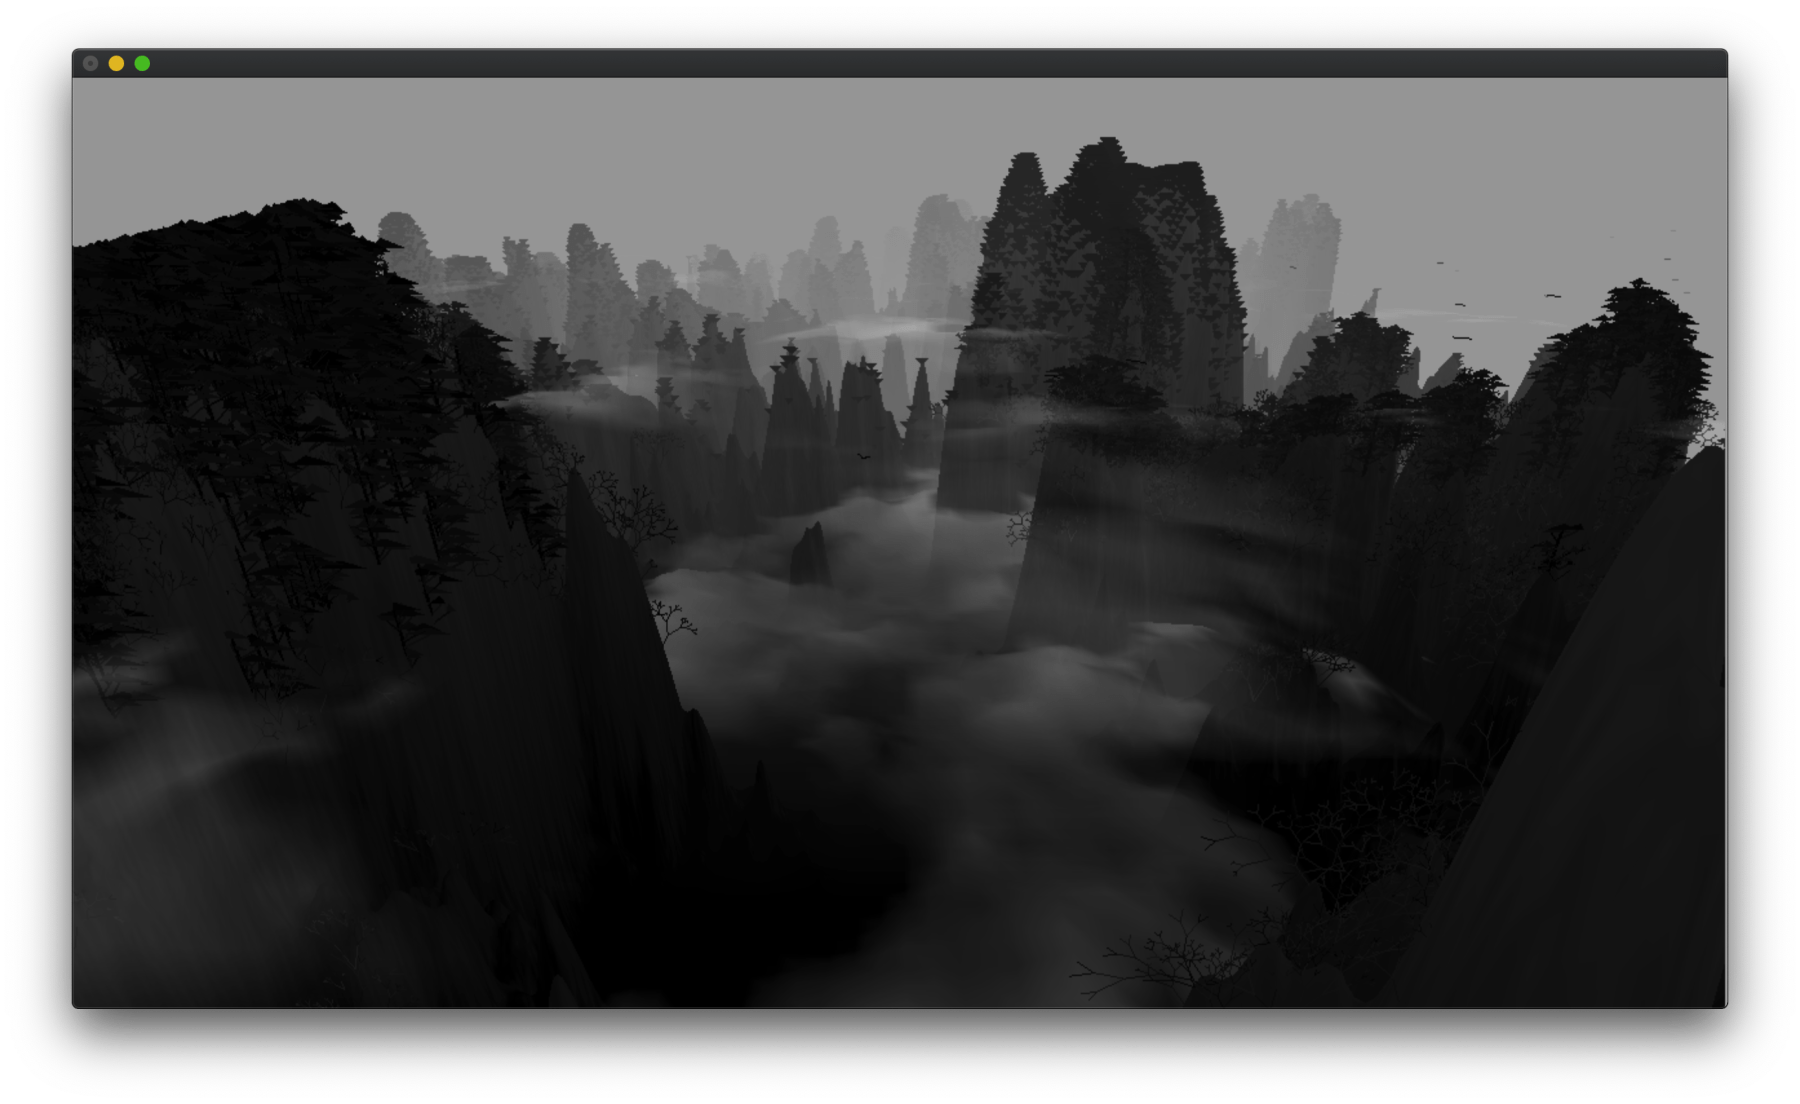
Final result:
Full source code is available here as a Github Gist.
Making a Screensaver
So far we made a C program that displays animated procedural landscape. Time to wrap it into a macOS screensaver.
If you're not on macOS, I'm afraid it's bye-bye time. There probably are tutorials for wrapping OpenGL programs to screensavers for Windows and Linux. It might even be easier to do than on a macOS. Good luck!
This section is mostly based on this guide, written in 2005. Considering the astounding speed Apple manages to deprecate stuff, it is amazing that this Tiger-era article still works. Perhaps it is this lack of love that allows the ancient art of screensaver-making to survive.
First we need to create a new project in Xcode, where we select “Screen Saver” instead of “Command Line Tool” like before:

Then we need to create some new files, so the navigator sidebar looks something like this, (with “foo” being the name of the project):
- foo
   |-fooView.h
   |-fooView.h
   |-OglView.m
   |-OglView.h
   '-info.plist
In fooView.h, dump this code:
#import "OglView.h"

#import <ScreenSaver/ScreenSaver.h>

@interface fooView : ScreenSaverView
{
  OglView *glView;
}

- (void)setUpOpenGL;

@end
In OglView.h, dump this code:
#import <Cocoa/Cocoa.h>

@interface OglView : NSOpenGLView
{

}

@end
In OglView.m, dump this code:
#import "OglView.h"

@implementation OglView

- (BOOL)isOpaque
{
  return NO;
}

@end
In fooView.m, first dump the C program we wrote earlier, but exclude the main function and other OpenGL boilerplates. (In other words, cut just before line 458 in my sample code). Then dump this at the end of the file:
#import "fooView.h"

// based on http://cocoadevcentral.com/articles/000089.php
@implementation fooView

- (id)initWithFrame:(NSRect)frame isPreview:(BOOL)isPreview
{
  self = [super initWithFrame:frame isPreview:isPreview];
  if (self)
  {
    NSOpenGLPixelFormatAttribute attributes[] = {
      NSOpenGLPFAAccelerated,
      NSOpenGLPFADepthSize, 16,
      NSOpenGLPFAMinimumPolicy,
      NSOpenGLPFAClosestPolicy,
      0 };
    NSOpenGLPixelFormat *format;
    format = [[[NSOpenGLPixelFormat alloc] initWithAttributes:attributes] autorelease];
    glView = [[OglView alloc] initWithFrame:NSZeroRect pixelFormat:format];
    if (!glView)
    {
      NSLog( @"Couldn't initialize OpenGL view." );
      [self autorelease];
      return nil;
    }
    [self addSubview:glView];
    [self setUpOpenGL];
    [self setAnimationTimeInterval:1/30.0];
  }
  return self;
}

- (void)dealloc
{
  [glView removeFromSuperview];
  [glView release];
  [super dealloc];
  free(birds);
  free(heightmaptree);
  free(heightmapnorm);
  free(heightmap);
  free(p_perlin);
}

- (void)setUpOpenGL
{
  [[glView openGLContext] makeCurrentContext];
  setup();
}

- (void)setFrameSize:(NSSize)newSize
{
  [super setFrameSize:newSize];
  [glView setFrameSize:newSize];

  [[glView openGLContext] makeCurrentContext];

  // Reshape

  [[glView openGLContext] update];
}

- (void)startAnimation
{
  [super startAnimation];
}

- (void)stopAnimation
{
  [super stopAnimation];
}

- (void)drawRect:(NSRect)rect
{
  [super drawRect:rect];

  [[glView openGLContext] makeCurrentContext];

  glViewport( 0, 0, (GLsizei)self.bounds.size.width, (GLsizei)self.bounds.size.height );
  draw((GLfloat)self.bounds.size.width, (GLfloat)self.bounds.size.height);
  glFlush();
  frameCount++;
}

- (void)animateOneFrame
{
  // Adjust our state

  // Redraw
  [self setNeedsDisplay:YES];
}

- (BOOL)hasConfigureSheet
{
  return NO;
}

- (NSWindow*)configureSheet
{
  return nil;
}

@end
Due to lack of knowledge of Objective C, I cannot provide more insight to what some of the listed code means. Just dump them in Xcode and it should work.
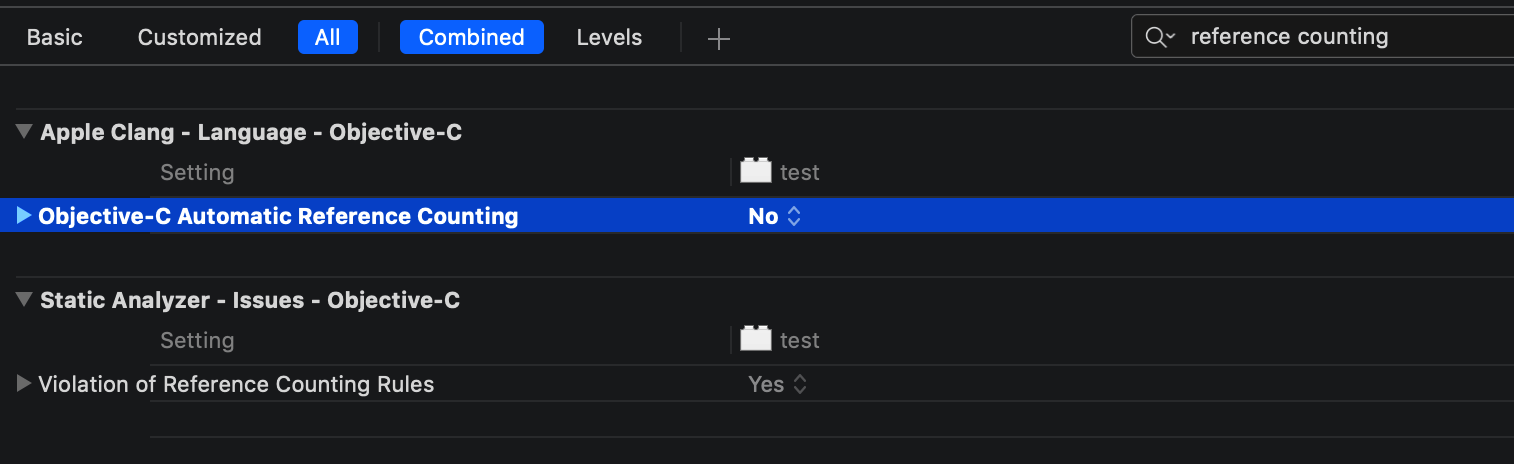
Now click build. If it doesn't work and complain about “Automatic Reference Counting” stuff, you need to disable it in “Build Settings” then “Objective-C Automatic Reference Counting” by setting the field to “No”.
Finally click build, and you should get a foo.saver in “Products” in the left sidebar. Right click on it and choose “Show in Finder” to locate the file. Then copy past it to the following path:
~/Library/Screen\ Savers
Or you can double click it to directly open in “System Preferences”, which never quite worked for me.
Finally, go to “Desktop & Screen Saver” in “System Preferences”, and you should be able to choose this new screensaver, like so:
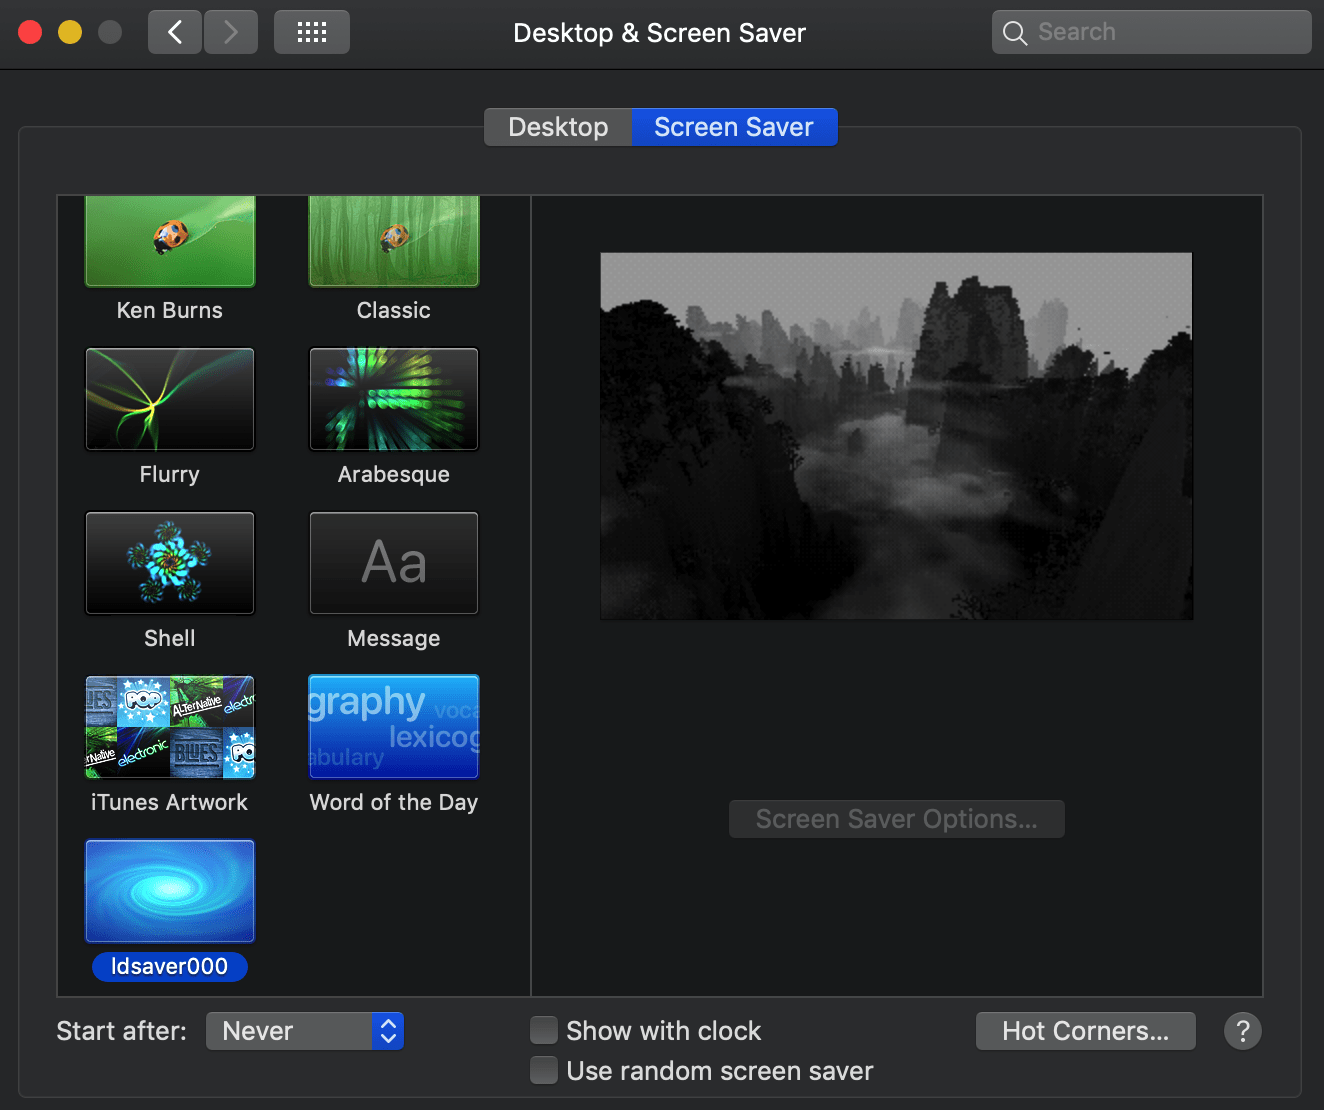
Note that it is a rather “heavy” screen saver we just created, so expect “System Preferences” to crash sometimes when switching to and from the saver. In which case, just reopen “System Preferences”.
Done! Click “Preview” to see the screensaver in action.
You can download the precompiled screensaver here. (Tested on Mojave and Catalina).
Notes
- There're perhaps many ways to improve the performance. For instance, I'm using OpenGL “direct mode”, which is intuitive but slower and deprecated. The recommended ways are that of the “buffered mode”; but then again, why don't I just use a framework instead?
- As a quick project, I gave most generative elements simplest treatments; However the program is on the verge of starting to lag on my old MacBook, so I really couldn't add much fine details without drastically improving performance first.
- Apple is deprecating OpenGL for their proprietary Metal. I wonder how long this method will continue to work. Maybe just enjoy while it lasts?
Perhaps it can be said that by using direct mode OpenGL to make a screensaver with grayscale generative landscape, I'm using a deprecated flavour of a deprecated framework to make a deprecated thing of a deprecated aesthetics.
But anyways, it sure was a fun little experiment. I hope you enjoyed it too. Thanks for reading.