Polygon Self-Intersection Removal
2021/06/21
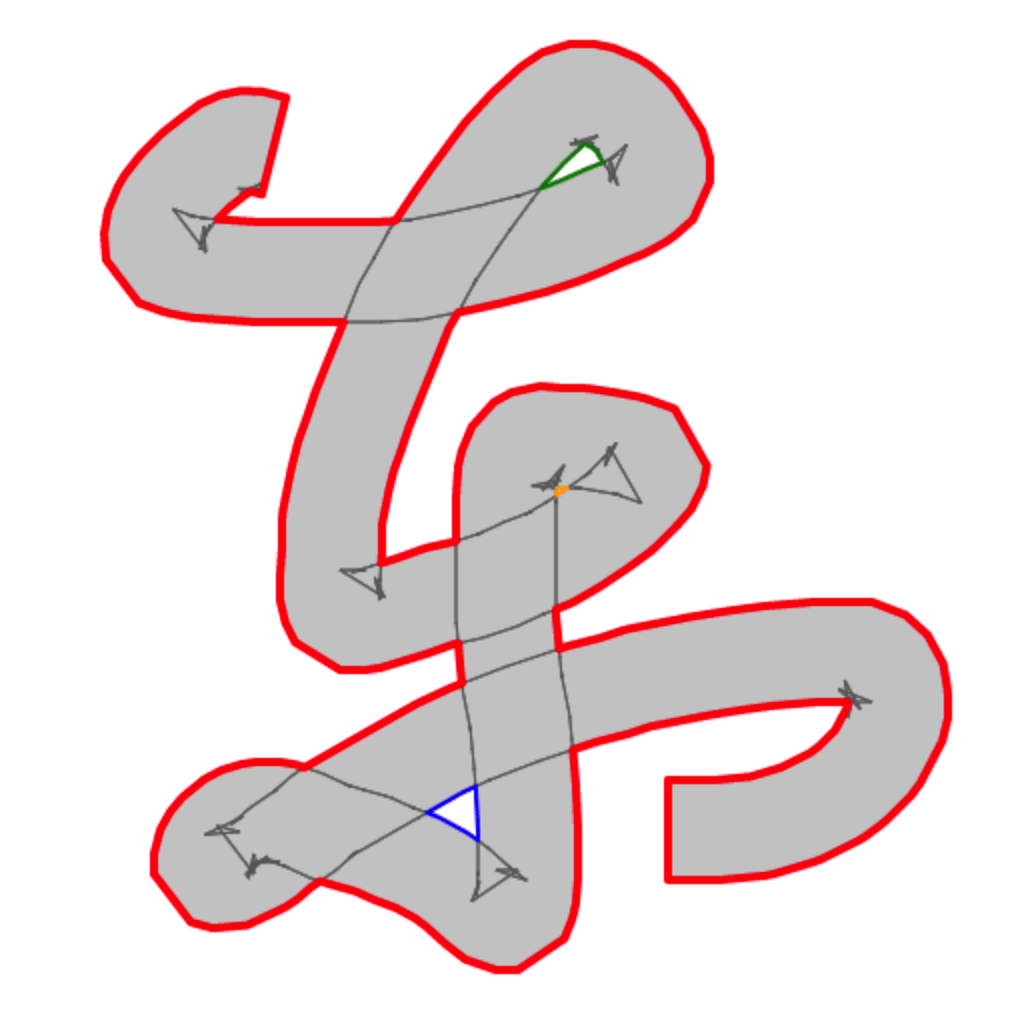
When you start manipulating a concave polygon in any meaningful way, it is very likely you'll start to get self-intersections, which is unfortunate since these nasty debris wrecks most polygon algorithms you want to further apply. Maybe you want to outline a stroke (i.e. thickening a polyline into a polygon); Maybe you need to dilate or add noise to a polygon, or perhaps, you're simply given bad data. All these self-intersection-inducing situations I am (un)lucky enough to encounter. Each time I would come up with some sort of hack that's “good enough” for the particular case. But one day, I decided that I'll solve the problem, properly, once and for all. The resultant algorithm survived my horrendous stress tests and came in handy in my subsequent polygon adventures. I am unsure if it has already been described elsewhere before, or if there're better algorithms, or if it's so basic that everyone knows already. Nevertheless, I had a fun time coming up with it, so I thought I'd share.
The Algorithm
The general idea of the algorithm is not unlike the infamous convex hull algorithm named Graham scan. We start with one valid vertex, and figure out where to go from there, gradually tracing out the full outline.
Let's jump right in! Here's the full algorithm:
Start with the leftmost vertex. At each step, call the current vertex A, and the next vertex in the original polygon B, according to clock-wise winding. Push A to the output, then:
- If AB does not intersect with any edge. advance to B. Repeat.
- If there're one or more intersections, look at the one closest to A. Call the edge that causes this intersection CD. Go to C if C is on the LEFT side of AB, and D otherwise. Repeat.
And that's it! Or, if you prefer my catchier alternative:
“Turn left at crossroads!”
Winding
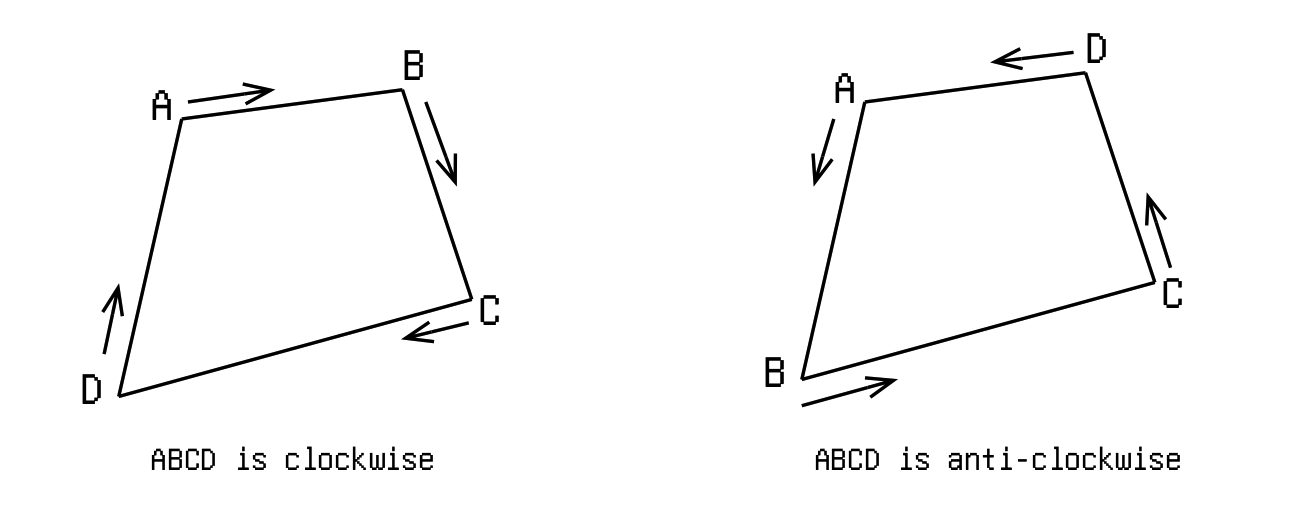
Before delving into the workings, let me explain the essential concept of “winding”. Winding is a fancy word for the order of which you enumerate the vertices. You can have clockwise order, or anti-clockwise order, simple as that. Though there's no “correct” order to wind a polygon, people usually keep it consistent within a same software system, and generally use opposite winding for outlines and holes (we'll see why this makes a lot of sense). It is easy to determine and convert between windings (e.g.), so here we'll consistently produce clockwise winding for simplicity.
Examples
Let's examine the algorithm by looking at some simple cases.
Below-left the shape known as “figure-of-8”, a polygon with a single self-intersection.
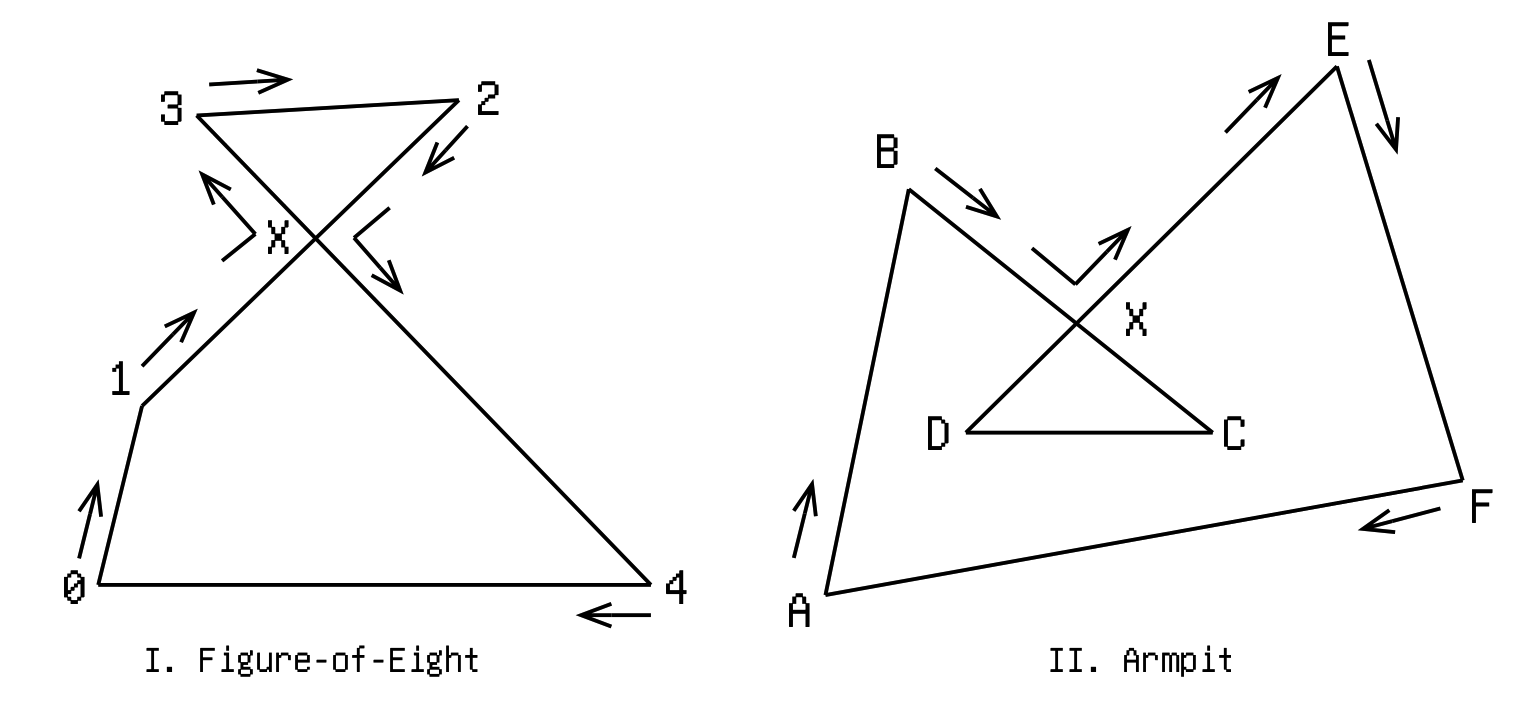
We start at 0 (leftmost vertex), going clockwise to 1. Now edge 1-2 intersects with 3-4 at point X, and we need to do something. Continuing to 2 is definitely out-of-question because we would still have the intersection right there. Our only choice is between 3 and 4. Now imagine standing at X and looking toward 2. We'll find 3 on our left, and 4 on our right. Applying our golden rule “turn left at crossroads”, our next destination shall be 3. And keep going clockwise, we arrive at 2. And… we encounter the intersection again! Now the choice is again between 3 and 4. This time, standing at X and looking toward 1, we find 4 on our left. So to 4 we go. Finally, we hit 0, where we started at, and the journey is complete. The final sequence is 0-1-X-3-2-X-4-0.
Above-right is another typical example of a polygon with a single self-intersection. I don't know what they call it, but I'm gonna call it “armpit”, since it often occurs when offsetting a polygon or polyline at concave turning points.
This time starting at A we go clockwise to B. Finding the crossroad at X, we pick the left road to E. We continue clockwise to F, and finally return to A. The final sequence is A-B-X-E-F-A. Notice the problematic self-overlapping part DXC gets removed. Cool!
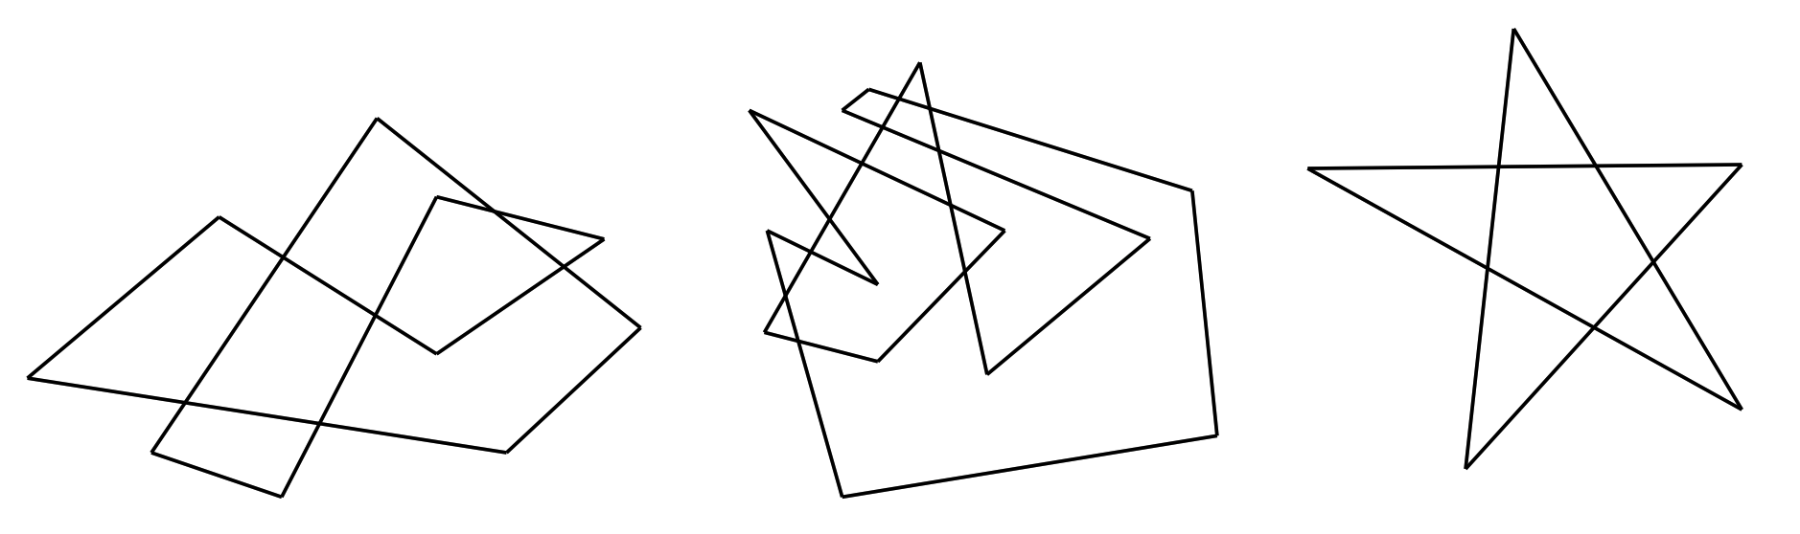
Feel free to try it out on these more complicated examples below: (Forget about holes for now, we'll figure those out in later sections)
Intuition
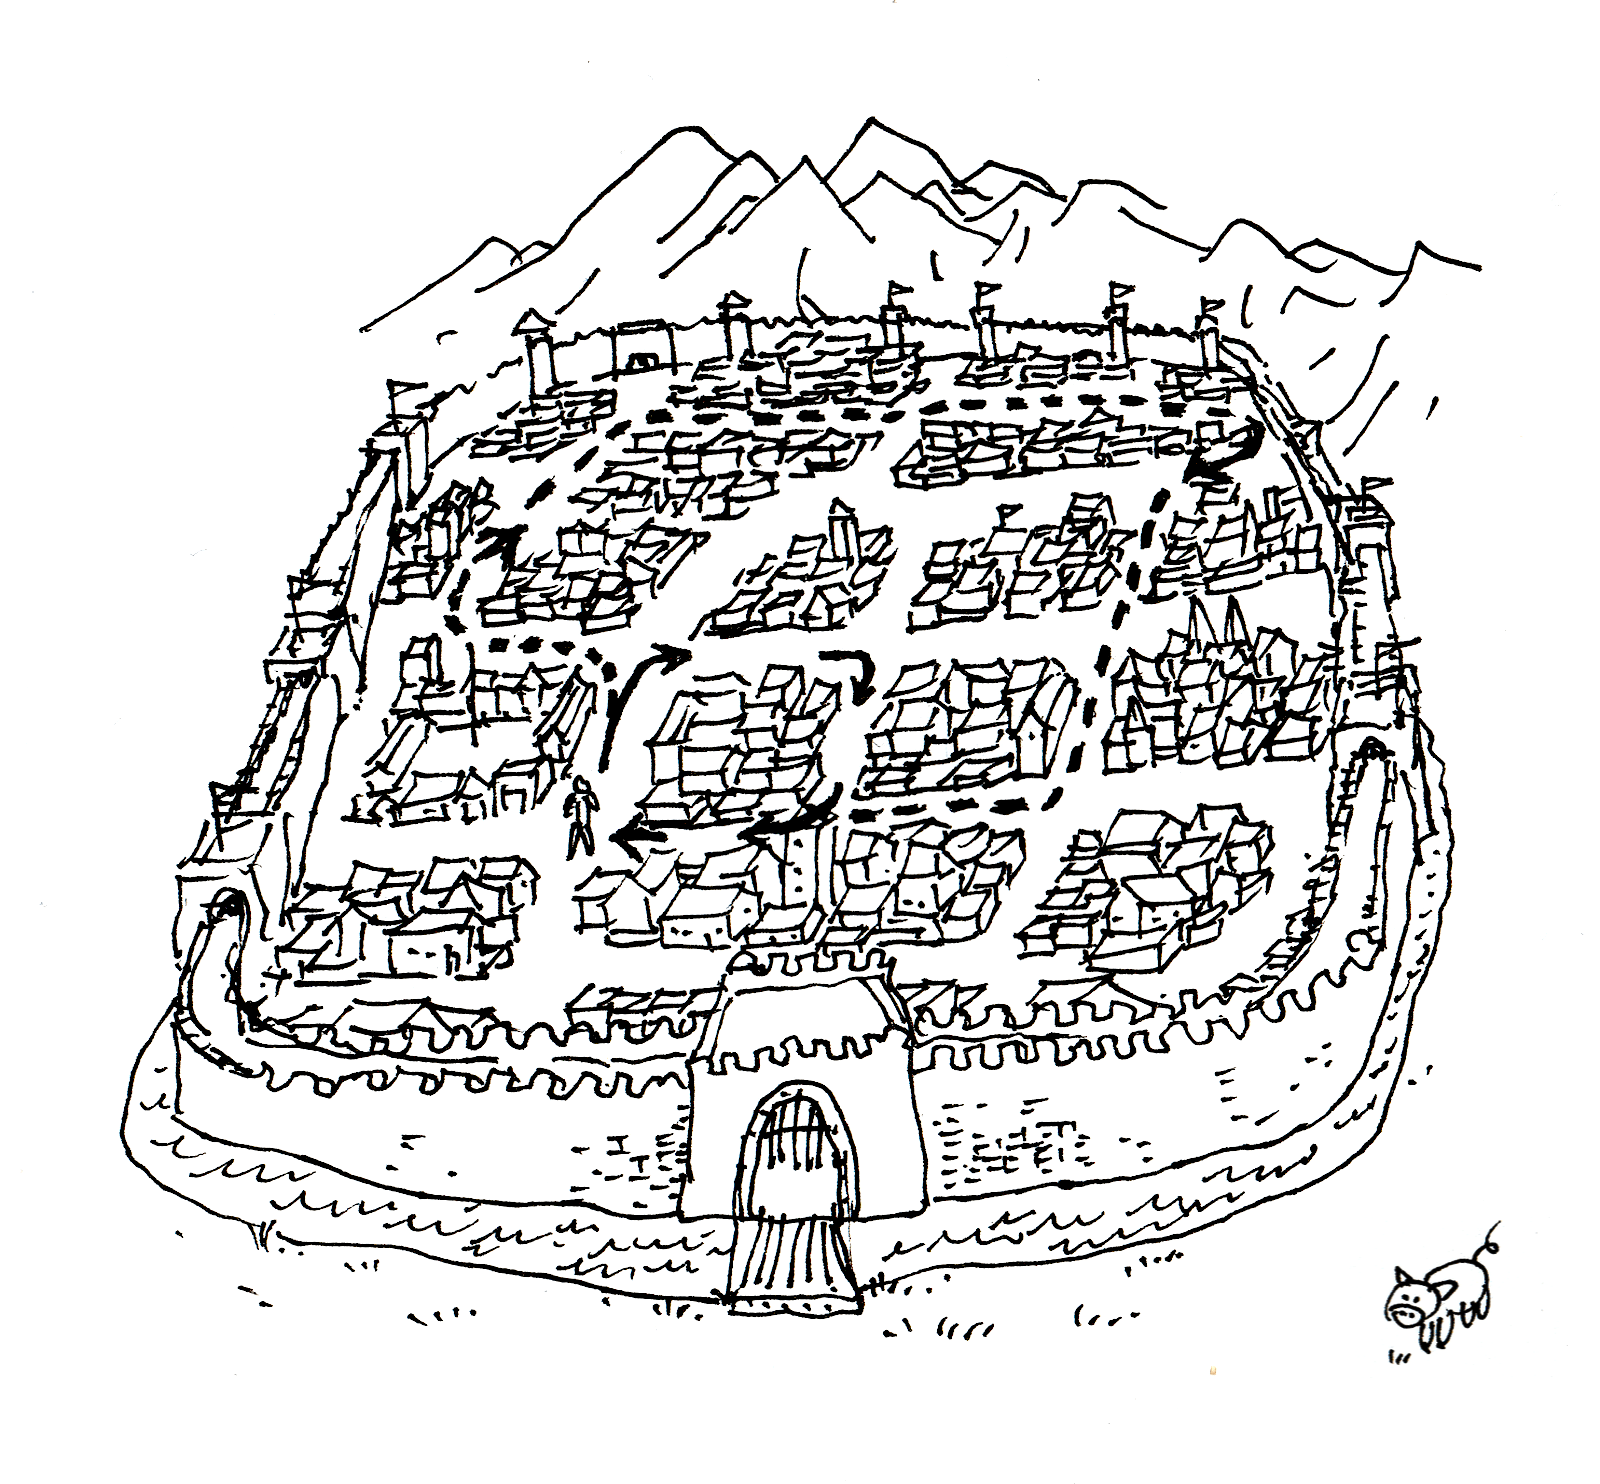
Before we look into the implementation details, let's take the chance to get an intuitive idea of why always “turning left at crossroads” work. We posed the problem of “self-intersection removal” but what we actually need to find is an “outline” from a mess of shards. We don't care how tangled up the entrails are; we just need the outermost edges. Therefore, the “gist” is to always try to include more shards in our traversal. Imagine walking in a city. If we keep turning right, we'll end up walking in a circle; the more steeply we turn right, the smaller the circle. Every time we take the chance to turn left instead, we'll end up covering a larger area with the tour.
Implementation
There're probably many ways to implement this. I went with a rather straightforward approach:
- Compute all the intersections between every pair of edges of the polygon.
- Store intersection information in the datastructure of each affected edge/vertex, sorted by distance to vertex. Information include position, which of the vertices of the other edge is on the left of this edge, and the parameter needed for sorting, etc.
- Traverse through the vertices clockwise. If the vertex's edge contains any intersection, “jump” left at the first intersection.
- Continue the process after jumping to the new edge. When we revisit the first vertex, the tour is complete; return the visited vertices.
Holes
The next question is how to identify holes. This actually depends on how one defines “holes”, which we'll see soon. However, without this realization, at first I came up with a naive heuristic by looking at simple examples: “holes are internal polygons that does not share vertices with the outline”. (e.g. In Figure III. below, A and B don't share vertices with the outline, and thus are holes, while C and D are not due to shared vertices.)
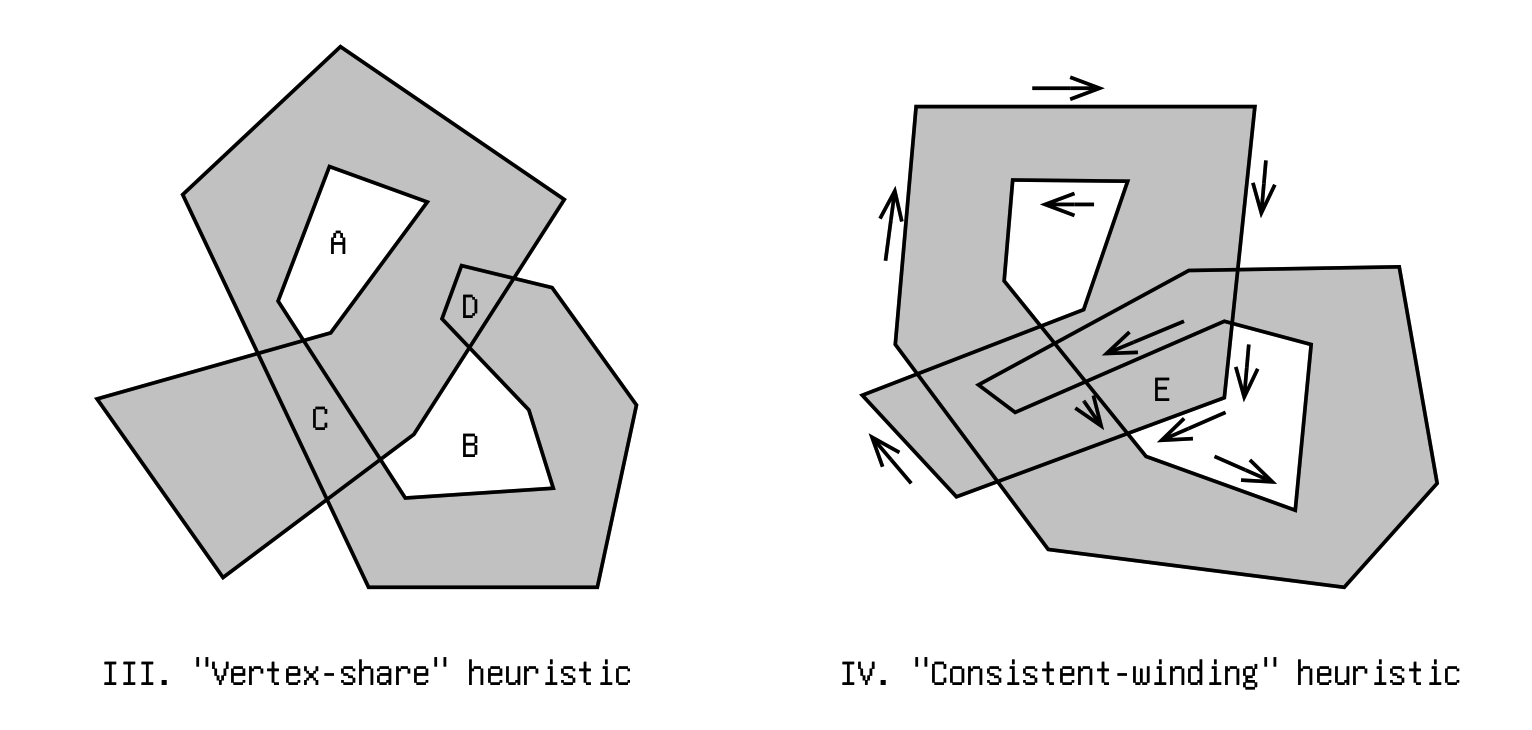
I soon realize this doesn't quite capture what I want: many which I personally don't believe are holes are falsely included. With more careful observation, I added another rule: “all holes must have consistently counter-clockwise winding (assuming the outline is clockwise)”. (e.g. in Figure IV. above, some edges of E are clockwise, and others counter-clockwise, therefore E is not a hole, even though it doesn't share any vertex with the outline)
However, even this is not suffice. Looking at Figure V. below, polygon F doesn't share any vertex with the outline, it does have consistent counter-clockwise winding, but it shouldn't be a hole. In fact, looking at its local region, it is quite like a hole: the only problem is that an unforeseen flap coming from elsewhere covered it up.
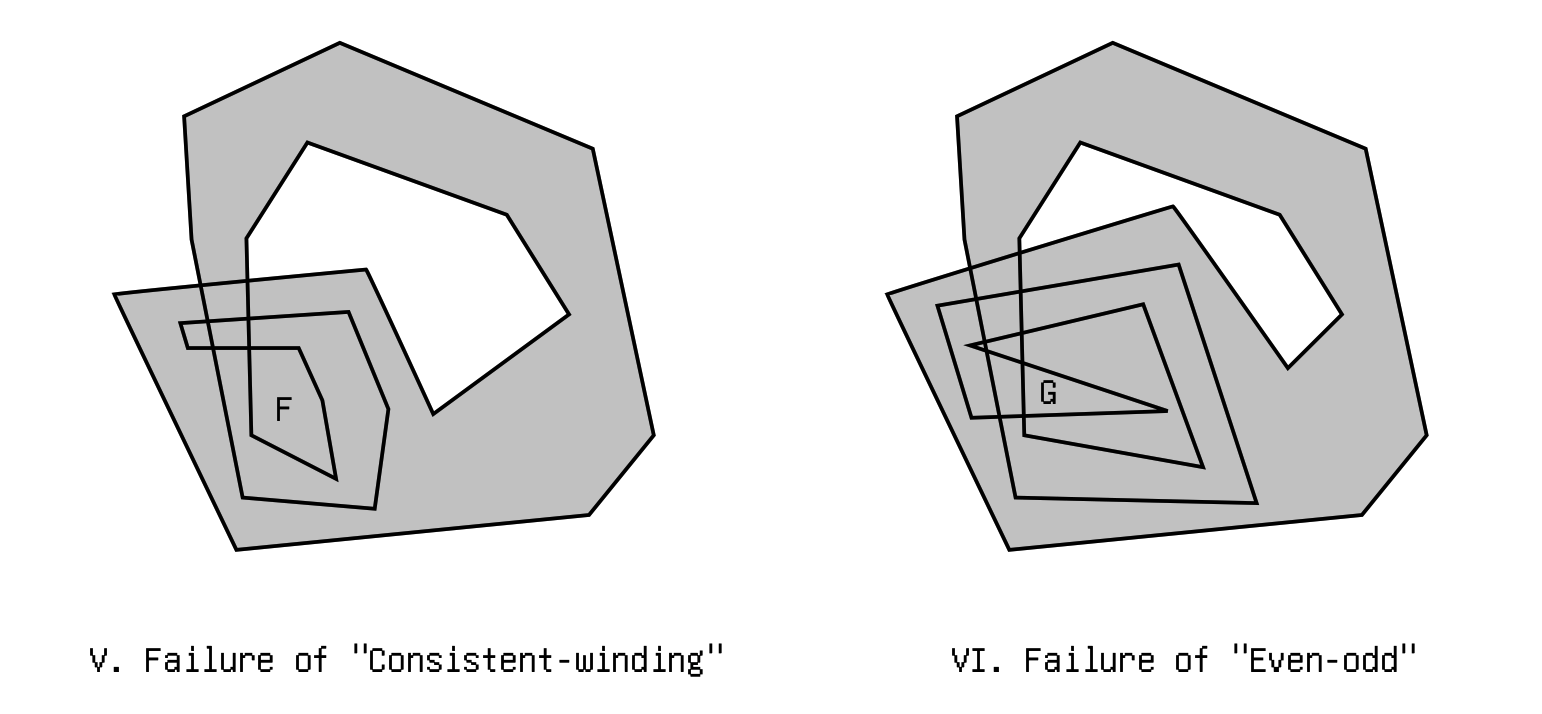
So I came up with a third rule, based on the “point-in-polygon” test. The well-known test goes like this: draw a ray from the point-in-question extending to infinity. If the ray crosses the edges of the polygon an even number of times, the point is outside of polygon; otherwise it is inside. And indeed: if we do that to a point in F, it always cross the border an odd number of times, so F is not a hole.
But alas! look at polygon G in figure VI. A point in it will cross the border an even number of times, but G shouldn't be a hole. In fact, our even-odd test will only work some 50% of the time (depending on how crooked our input polygon is).
I was stuck for a little while, it appeared that I was out of heuristics. Then suddenly, I vaguely remembered that there exists something similar to even-odd test, but different. I forgot what it's called but it might just work! Luckily, there's a link to it on the Wikipedia page for the even-odd test. It's called “Nonzero rule”.
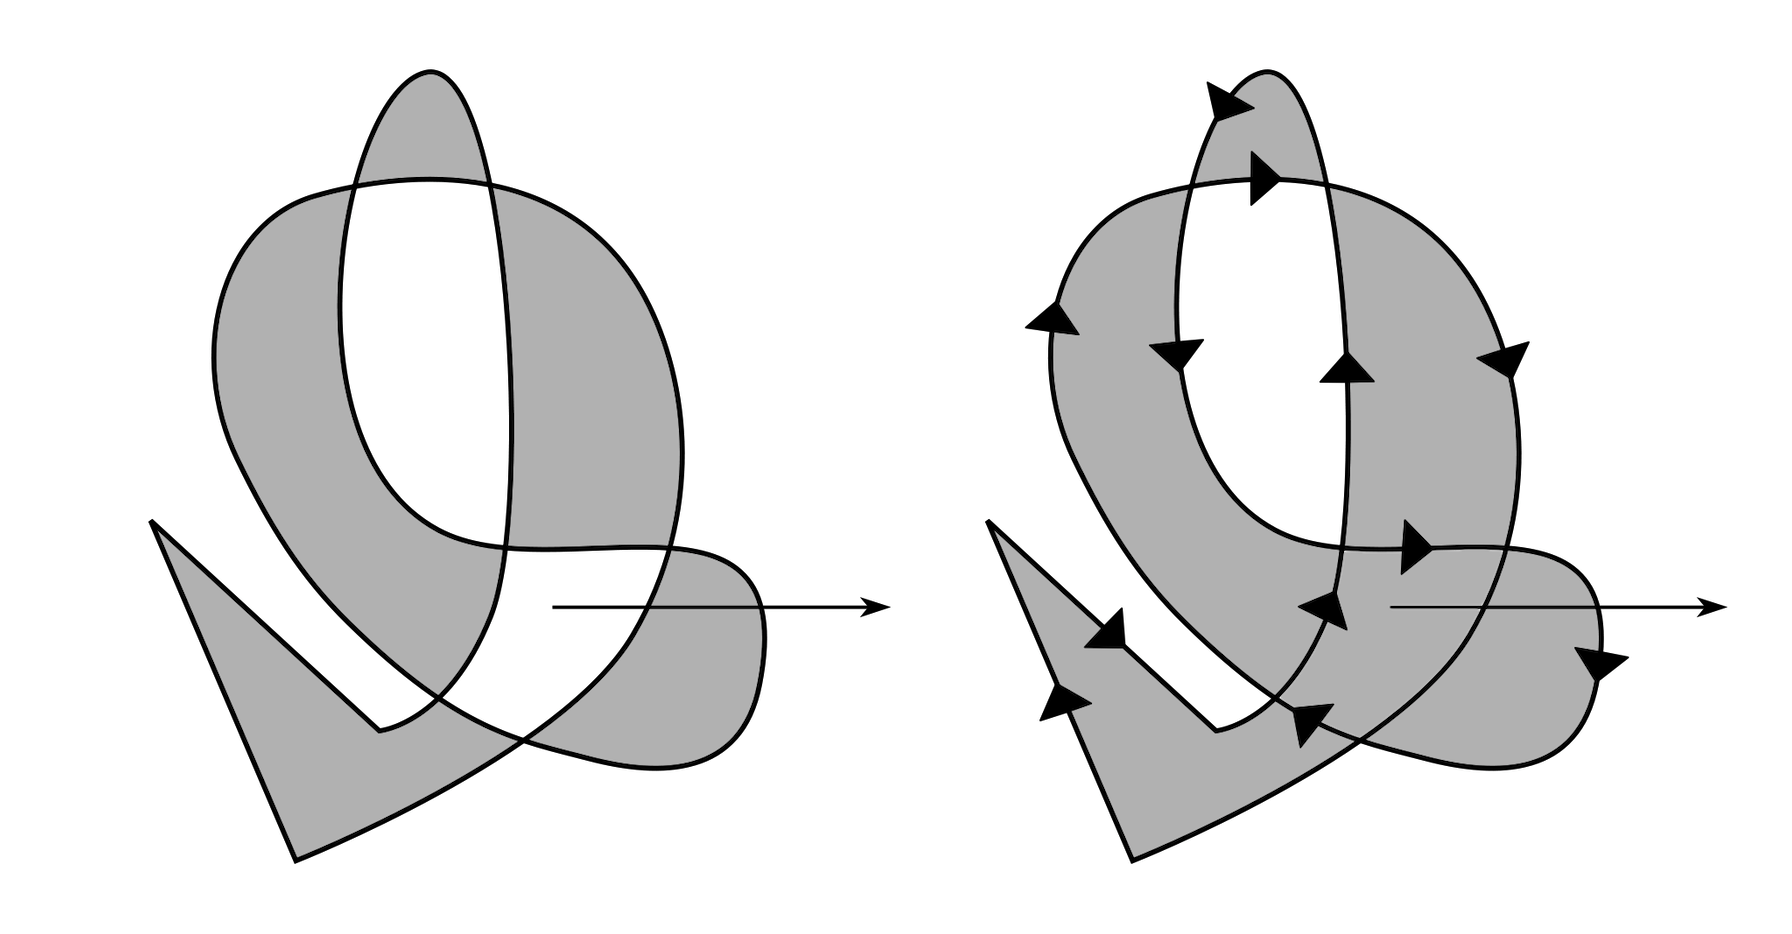
It's ingenious how the nonzero-rule works. We make a ray, just like in the even-odd rule, but instead of counting the number of crossings, we look at the winding of the edges crossed, and keep a sum: clockwise subtracts 1 from it, counter-clockwise adds 1 to it. In the end, if the sum is zero, the point is outside of the polygon; otherwise, inside.
I suddenly realized this is exactly what I was looking for all the time; it's already a solved problem by smarter people who came before me. (Nevertheless I did have fun with my own incompetent attempts).
And at the same time came the realization that the even-odd rule is also a legit definition of holes, and so are infinite other ways (It just depends on what you think is the meaning of the word “hole”). For my intended use cases, they're not quite as useful as the nonzero rule, but I could imagine other use cases where they are.
Holes Implementation
Time to implement!
Given a vertex that we already know belongs to a hole, it is easy to trace out the whole hole from it. It is the exact inverse of the outline algorithm: Instead of turning left at every chance, we turn right at every chance. instead of covering as much as possible, we try to cover as little as possible, since holes cannot contain anything inside of it. In fact, We can reuse the code for the outline-finding by adding a couple toggles for the reversed behavior.
In order to find likely vertices to start with, I combined a couple heuristics:
- Firstly, every hole must contain at least one vertex that is an intersection between two edges. In other words, it is not possible for a hole to be entirely made of original vertices. Therefore, we start by looking at all the intersections.
- Depending how we define holes, we can filter out the vertices already contained by the outline. If we want to strictly adhere to nonzero rule, we shouldn't do this (see the comparison diagram above for example); But in some use cases, such as when outlining a polyline, such situations will not occur and we can safely apply this filter.
- And of course, if the vertex is already visited during a previous attempt at finding holes, we can skip it to avoid duplicate work.
After tracing out the polygon, we finally apply the non-zero rule, to check if it is indeed a hole.
The intuitive way that comes to mind, is to first find an arbitrary point inside of the polygon, then do the ray test, etc.
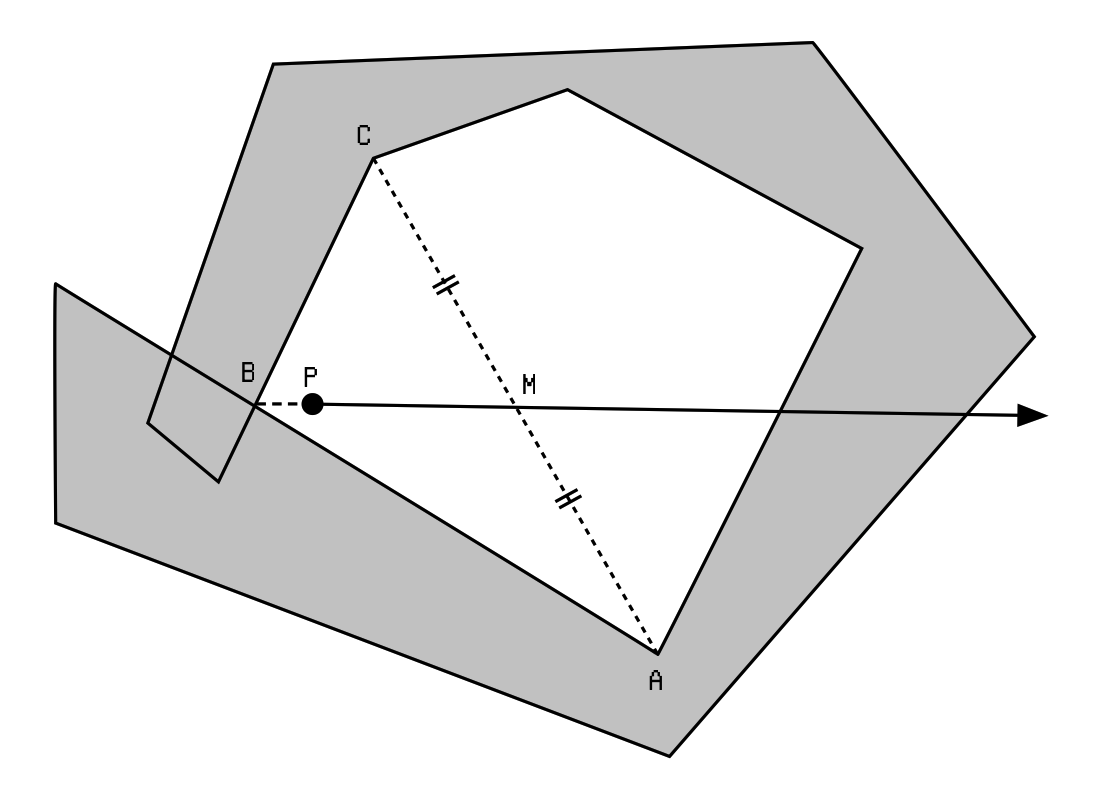
Thinking more carefully, this can actually be done in a single step: Find a convex vertex . Call its adjacent vertices and . Let be the midpoint of . Compute point using , where is a tiny value. is the ray we want for the nonzero test.
With this method, we can even do the test before we've traced out the entire polygon.
While pretty good for moderately-sized situations, this implementation is not too efficient when there's a ton of intersections. I'm still thinking about improving it, perhaps something that involves converting to a halfedge representation first.
Degenerate-case Prevention
The curses of vector-based computational geometry: degenerate cases and numeric precision issues. To lift them, we apply some random disturbance to each vertex, so that no vertices or edges coincide with each other, which will otherwise surely wreck our algorithm.
Besides simply adding a random small number to X and Y of each point, I also experimented with dividing the plane into a grid of tiny cells, and making sure no two vertex share the same cell, by shifting offending vertices to empty neighboring cells. This seems to work pretty well, at the cost of some additional overhead.
Code
You can find my source code unmess.ts, a single-file 400-line TypeScript implementation here. There's also an online interactive demo. The details on how to use the library is also on the page.